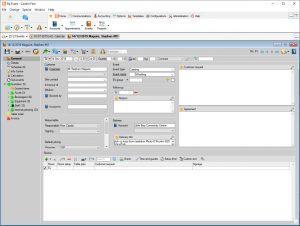
Create a new event
- Go to
 Home >
  Events >
  New.
New. - If you have a template for similar events, select >
 New from template.
 - Enter a date, start time and guest count. If the date is not fixed yet, enter a reference date and then select
 >
>  Undated.
 - Select a status and status date (such as confirm-by date). Status and status date will determine how and when the event shows in the
 Info Centre and
  Room reservations.
 - Link either an existing or a new account as
 Organizer or, if applicable, Orderer or Invoice Adress.
 - Enter an Event name (such as "50.Birthday").
- At the bottom of the window, select Rooms >

 New either via
  Room list or Room reservations.
 - If you prefer, check room availability first by selecting Home > Events > Room reservations, then doubleclick the room and date to create a new event.
- In the left-hand navigation pane, create a new
 Event schedule and
  link schedule items to individual bookings*.
Find linked records and data
- In the left-hand navigation pane, go to Info Centre.
- Select the
 Data sources you would like to see (such as Events, Appointments, Mails).
 - Set
 Filters within each data source or go to Related Lists and Reports.
 - Filter for
 your own records only.
 - Save your settings under Views >
 Save >
  User view,
  Group view or
  Standard view.
 - Create New records linked to the event. Only the type of records selected as data source will be available.
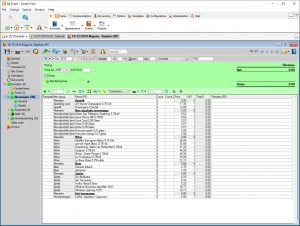
Create a quotation
- In the left-hand navigation pane, right-click
 Quotation and enter a name to create a new quotation.
 - Click on New or use the matchcode field to select and add sales items (such as food and beverages, staff, rooms, equipment).
- Add existing items to your quotation by clicking New
 >
>  Find items and entering the item name.
 - Add new items on-the-fly by clicking New >
 Item groups, selecting an item group and entering the item name.
 - To create a proper new item, select Create new and save the new item with all mandatory fields filled. To save the item for this one occassion only, select One-off item.
- Right-click an existing quotation and create a
 New alternative quotation to copy the details of the original and add variations (buffet instead of set menu). The changes only apply to the alternative, not the original.
 - For improved readability, create multiple quotations* for separate positions such as staff, food, beverages or reception, dinner, coffee break.
- In the horizontal toolbar, click
 Print and select a suitable template to print out your quotation.
Send a quotation by email
- Go to
 New >
New >  Mail > New to select a suitable template and, in the toolbar, change the method of communication to
  Email.
 - If you would like to send the quotation itself as formatted attachment, go to the toolbar of the Text tab. In the Event Sheet entry field, call up a list of available templates by pressing Space+Tab and select a suitable template.
- If you are using an external email application, save the quotation by selecting Print > Text >
 PDF and send it as an email attachment.
Create a sales order
- Convert your quotation into a sales order/contract by dragging individual quotations, alternatives or the entire Folder
 Quotation to
  Sales Order.
 - Add or change sales items, counts, rooms etc. at will. The original quotation will not be affected.
- Create
 Guest lists* to assign tables* or sell individual tickets* for the event.
 - Create custom
 Menu cards* from the selected items, adding individual texts as required.
* Modules Event schedule, Multi-Bookings, Appointments, Guestlists, Ticketing, Table Reservations
Screenshots