Tutorials 2020 / 2021
Tutorial 1
Organising an In-house Family Event

Level: Beginners
Duration: 90 to 120 min
The exercise can be saved and paused at any time.
Start Bp Event and log in as
User: Carolin
Password: cf (The password is case sensitive.)
Carolin Fine is an event manager responsible for the organisation and invoicing of events.
Aims and learning outcomes:
- Create an event
- Create and send a booking confirmation
- Create a quotation
- Create a sales order and send a contract
- Create a customized menu
- Create in-house worksheets for the kitchen and service staff
- Create a final invoice
Aim 1 Create an event
You will learn how to check room availability on a given date and create a booking request with all the relevant details.
Carolin has received the following email:
Dear Ms Fine,
I am hoping to celebrate my 40th birthday on 15 MM YYYY in your hotel. My family and I would like to celebrate the occasion in your much-loved Reading Room.
We are expecting 20 to 25 guests (no children) and would like to dine around 19:00.
If your Reading Room is available on that date, I would appreciate a written confirmation to the address given below. Due to my grandmother's ill health, I will only be able to give you a final confirmation on 11 MM YYYY.
If you have any further questions, please don't hesitate to call me at 0177-1234567.
Yours sincerely,
Charles Farmer
1 B St Vincents Cottages
Wood Quay
D08 T8W8
Dublin 7
Mr. Farmer knows the venue and is a regular customer.
1. Check room availability on the given date
- Go to
 Home >
  Events
 >
>  Room reservations to open the reservations calendar.
 - In the toolbar, change the
 Date to the 15th of the following month. The Reading Room is still available.
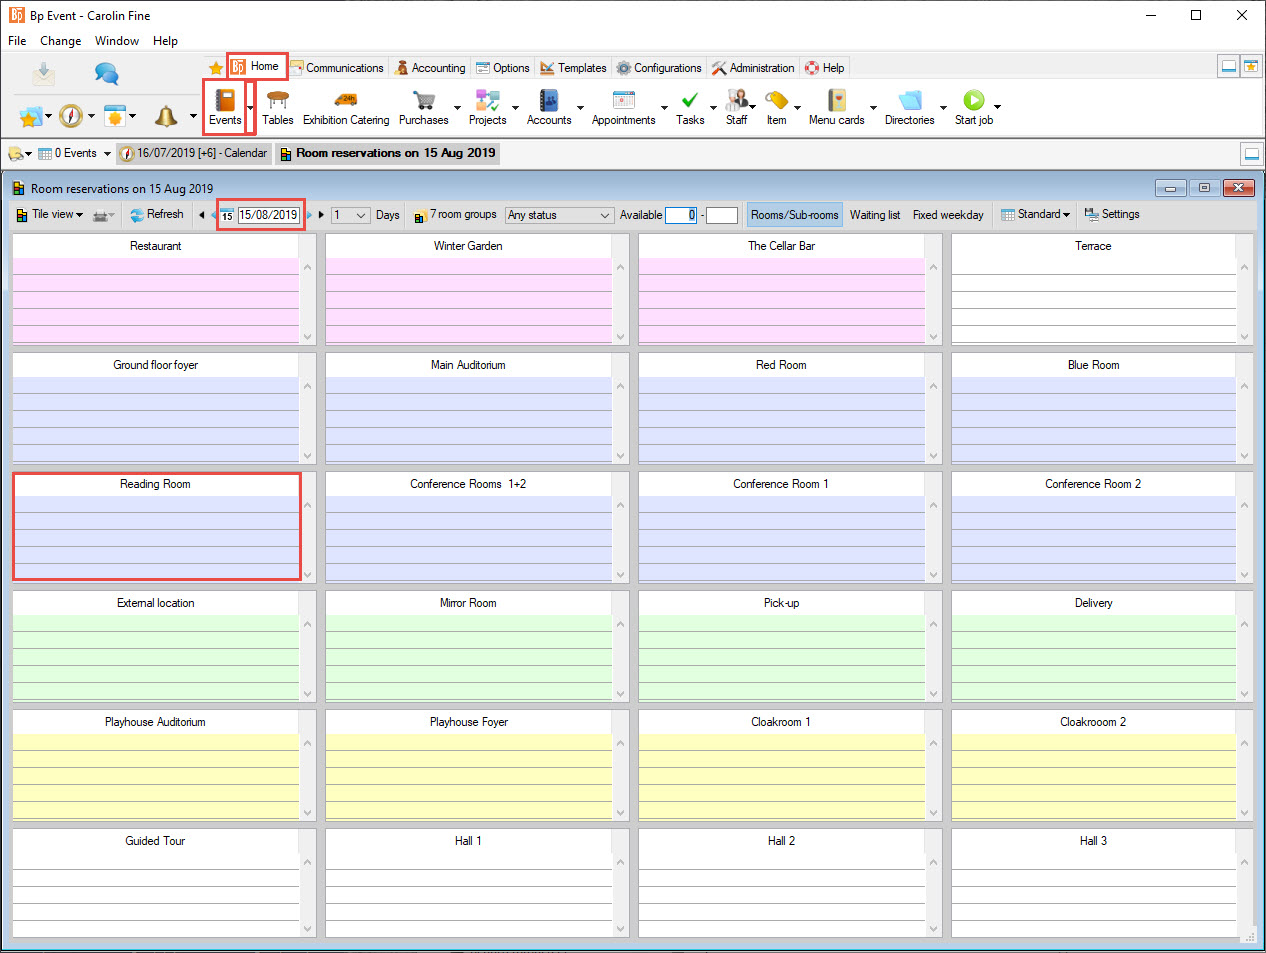
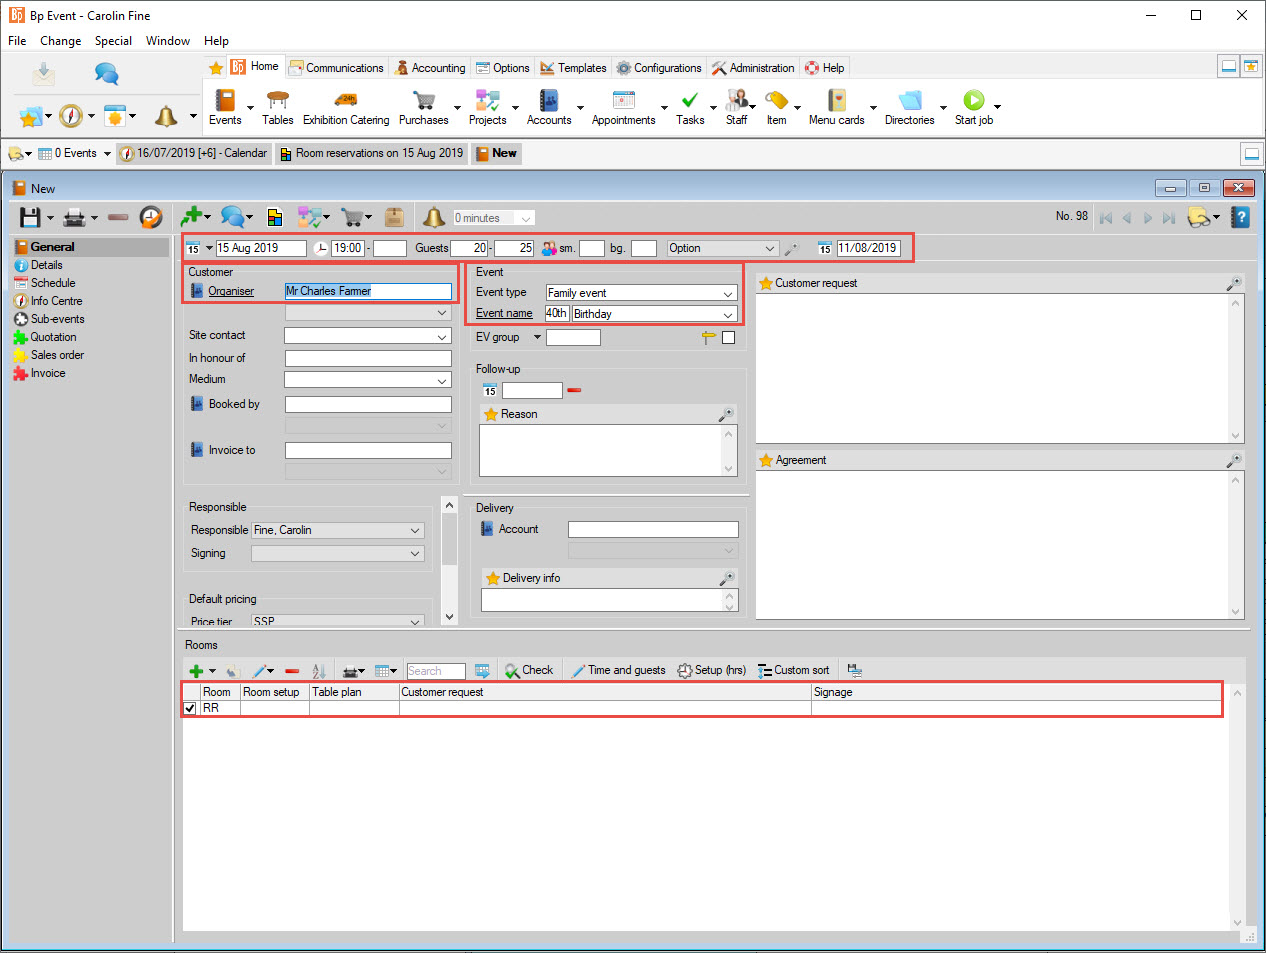
2. Create an event
- Double-click the Reading Room and select
 New to open the input window of an empty event. The date and room are already prefilled.
 - Enter the details from the email, pressing the tab key to go from field to field. A mouseover will give you a tooltip for the marked field.
- In the top line, select the status Option from the drop-down menu and enter 11/MM/YYYY as option date.
- Enter the first few letters of the host's name in the field
 Organiser and press Enter to open a list of matching entries. As a regular customer, Mr. Farmer has already been entered in the database.
 - Double-click the account to select Mr Farmer as organiser.
- Select the event name "Birthday" from the drop-down picklist and add "40th" in the preceding field.
- Fill all the mandatory fields before saving your record. Mandatory fields are mostly (but not always) underlined.
- Left-click
 Save in the left-hand corner of the input window to save your data.
Aim 2 Send a booking confirmation
You will learn how to send a booking confirmation listing all the details you have for your event.
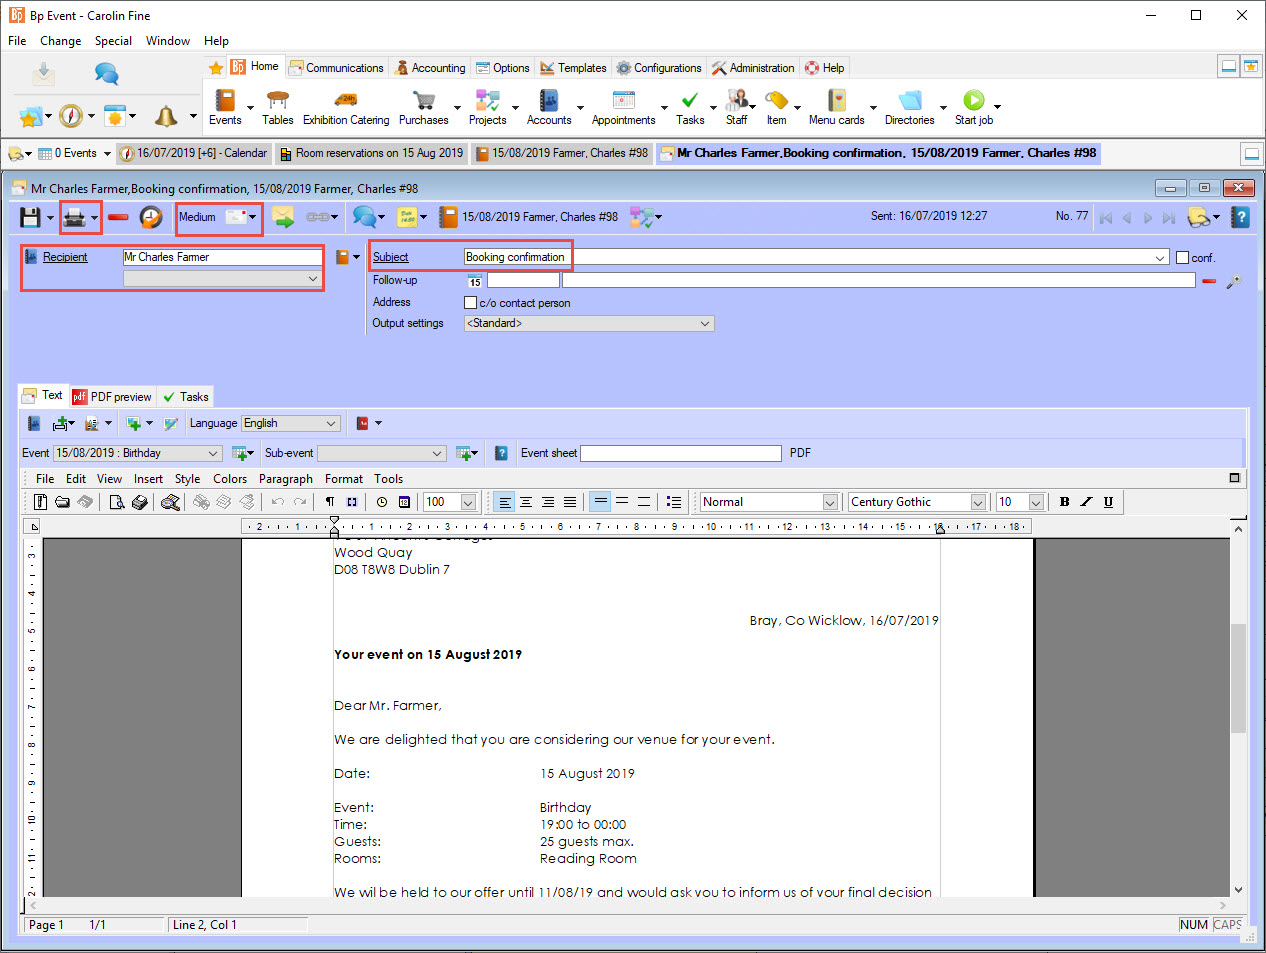
1. Create a new mail
- Mr. Farmer's event is still open. In the horizotal toolbar, left-click
 New record and select
  Mail > Mr Charles Farmer and the
  Booking confirmation template.
 - The input window for a new mail or email will open. The address and event details are already prefilled. The body text and formatting are provided by the template.
2. Print the mail in PDF format
- Save the mail in a PDF format with the default letterhead and watermark by left-clicking
 in the horizontal toolbar and selecting Text >
  PDF.
PDF.
Please note: Emails are sent by clicking Send in the toolbar. The school version of the database may not support this feature.
 - Close the mail by clicking and selecting
 Save and close.
3. Save and close the event
Close the event by clicking ![]()
![]() and selecting
and selecting ![]() Save and close.
Save and close.
Aim 3 Create a quotation
You will learn how to search for events, book sales items, extend a confirmation deadline and send a detailed quotation with several options to choose from.
Carolin has received another email:
Dear Ms. Fine,
Thank you very much for your booking confirmation. Would it be possible to extend the confirmation deadline to 12 MM YYYY?
We have now settled for a three-course set dinner. Could you please send me two menu suggestions including an aperitif, a small selection of wines and all other costs?
Thank you very much in advance,
Charles Farmer
1. Search for Charles Farmer's events
- Go to the Home tab on the top function bar and left-click Events to open the search window.
- Enter the event date and press Enter or click
 Search. Double-click the event to open.
 - Alternatively, go to your list of
 most recent records, either in the left-hand corner of the task bar or under Events and left-click to open.
2. Extend the confirmation date (status date)
The status date reminds you to take action when events are not confirmed in time. Unconfirmed event requests are colour-coded red in the room reservations and calendar.
- Extend the deadline for confirmation by entering the new date in the status date field, or use the date picker if you prefer to use the mouse.
- Save your event.
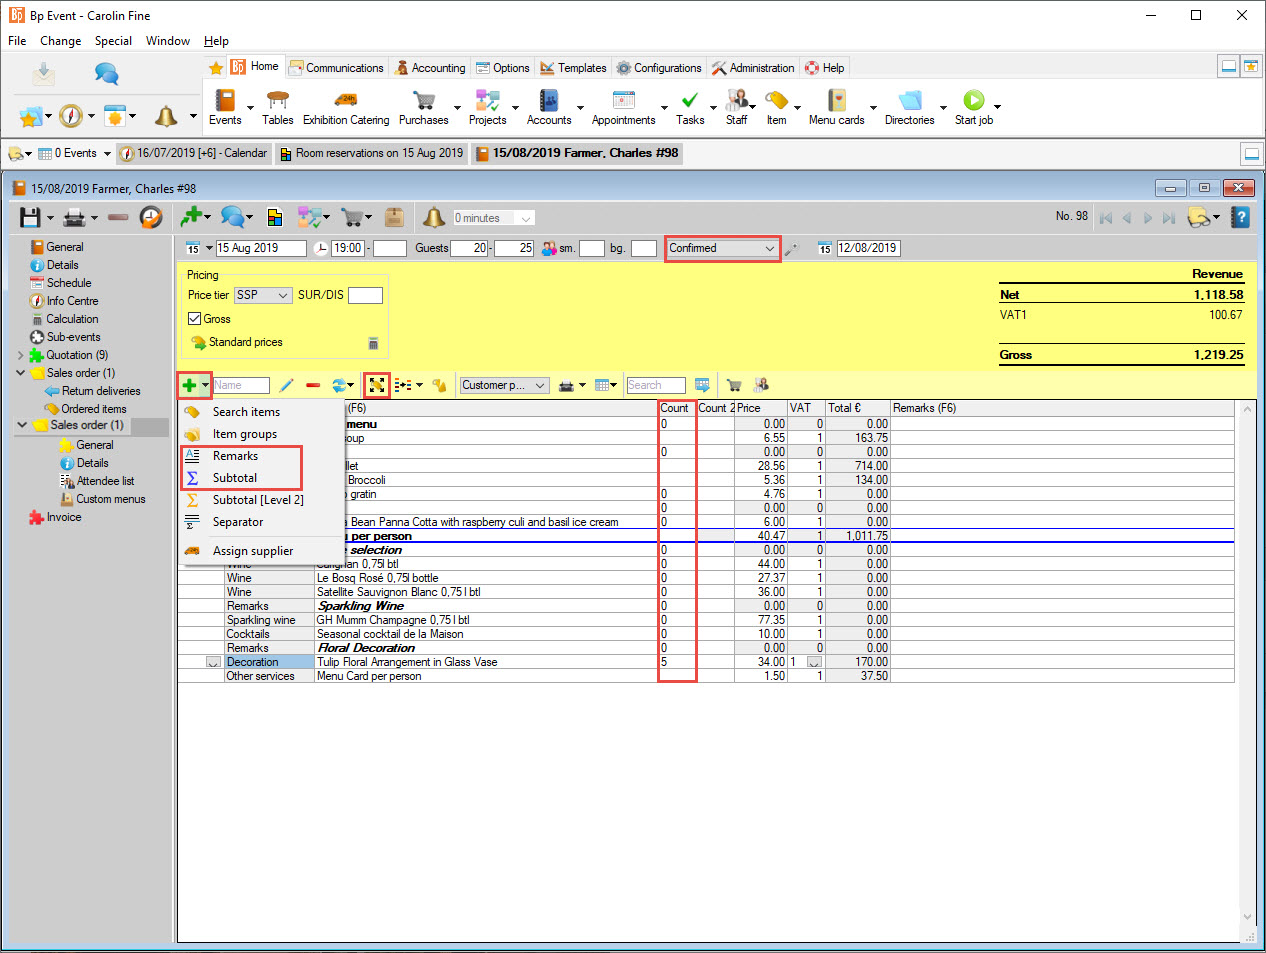
3. Add sales items to your quotation
Every event has three stages: ![]() Quotation,
Quotation, ![]() Sales Order and
Sales Order and ![]() Invoice.
Invoice.
- In the left-hand navigation pane, right-click
 Quotation to open a new empty booking and confirm the default name "Quotation".
 - Add sales items by clicking , entering the search term "Menu" and pressing Enter or clicking Search.
- A list with matching sales items will open.
- Press Ctrl and left-click Menus 1 and 2 to select, then click
 Apply.
 - Add a selection of wines by clicking , selecting the item group "Beverages" >"Wines" and Search.
- Press Ctrl and left-click two white wines and two red wines to select, then click Apply.
Hint: If you know already which item you are looking for, go to the match field next to the New button and press Enter to submit your search. - Add the following items:
a) GH Mumm Champagne 0.75 lSparkling wine
b) Seasonal cocktail de la Maison
c) Tulip Floral Arrangement
d) Menu card - Save your event.

4. Remove or change the position of an item
- Remove an item from your Quotation by left-clicking it and clicking
 Delete in the toolbar.
 - Change the order of items by left-clicking the item, pressing Alt and dragging the item to the desired position. The selected item is always inserted below the marked row.
- Save your event.
5. Print the quotation
After adding all requested items, print a customer copy of the quotation.
- Left-click and select
 Standard Quotation 10 > PDF output.
 - Confirm the prompt with OK to print the quotation including all the relevant details from the event.
Aim 4 Create a sales order and print a contract
You will learn how to change the event status, add a room setup and change sales items.
Carolin has received the following information by phone:
- The celebration will take place as planned.
- Room setup: banquet setup with round tables
- Wine selection: approved
- Aperitif: sparkling wine
- Food: Menu 1 but with Potato Gratin instead of Macaire Potatoes
1. Change the event status
- Find and open the event (s.a.).
- Change the event status from Option to Confirmed.
2. Add the room setup
- Go to the Rooms list at the bottom of the window.
- In the Room setup drop-down menu, select banquet.
3. Create a sales order
- Left-click the Quotation folder and drag it onto the
 Sales order folder, keeping the mouse button pressed down.
 - Tick Key data and Items, rename the booking to "Sales Order" and click on Copy to create a new sales order.
4. Delete or modify a sales item
- Select any rejected items (Menu 2 and Seasonal cocktail de la maison) by left-clicking with a pressed Ctrl key and delete.
- In order to change the side dish, you will need to expand the menu to show the individual components.
- Select Menu 1 and click on
 expand, then opt for Item prices.
 - Select the Macaire Potatoes and overwrite the item name with the first few letters of the new item, i.e. "pota".
- Press Enter to confirm.
- Double-click the Potato Gratin in the list of matching items to replace the side dish.
5. Insert a subtotal
- Select the last menu item (dessert selection).
- Click on and select
 Subtotal to insert a lower sum underneath the selected item.
 - To change the text in a larger entry panel, select the subtotal and press F6.
- Change the subtotal name to "Menu per person".
6. Modify the item count
- Enter a "0" count to list prices per unit for items like wine or aperitif, as the exact amount needed is as yet unknown.
- Enter a suitable number for items that are charged per piece but not directly related to the number of guests, like flowers or equipment. Here, enter "5" for floral decorations.
- Leave the cell completely empty for items like food to apply the maximum number of guests automatically.
7. Apply formatting for improved readability
- Insert a headline by selecting the line above the first wine on the list and pressing F5. In the new "Remarks" line, change the text to "Wine Selection".
- Right-click the complete text and apply Bold + Italic formatting.
- Drag the line into a different position by left-clicking and keeping the ALT key pressed down if needed.
8. Print the contract
Book and double-check all items and item counts before printing the contract.
- Go to > Standard Contract 10 > PDF output.
- Confirm the prompt with OK to print the contract including all the relevant details from the event.
9. Create a follow-up
Create a reminder four days prior to the event in order to check for last-minute changes.
- Go to the General tab of the event.
- Enter 11/MM/YYYY in the Follow-up field.
- In the Follow-up Reason field, click on
 Reason and, with Ctrl key pressed, select
a) check text on menu cards
b) confirm decorations
c) confirm guest count
and Apply or enter individual text.
10. Change the event status
Mr. Farmer has returned the signed contract to Carolin.
- Change the status from Confirmed to Contract.
- Close the event by clicking and selecting Save and close.
11. Go to 13/MM/YYYY
It is now 13/MM/YYYY.
- Press F8 to open the Info Centre and go to 13/MM/YYYY.
- In the bottom part of the Info Centre window, you will now find your reminder of the upcoming event in the list of Follow-ups.
- Double-click on the event in the Info center to open.
During her phone call, Carolin gets the following information:
1. 22 guests confirmed
2. Text for menu cards: Happy 40th Birthday!
3. Image for the menu card was sent by email and has been saved under Images/Image Menucard Charles Farmer
12. Change the guest count
- Change the number of guests in the toolbar to 22.
- Delete the follow-up as there are no further questions.
Aim 5 Create a custom menu card
You will learn how to create and print a customized menu card with an image.
1. Enter custom text
- In the left-hand navigation pane, open the Sales order folder and go to
 Custom menus.
 - In the field Custom menu for, enter "Charles Farmer".
- In the field Custom menu text, enter "Happy 40th Birthday!"
2. Add an image
- In the top function bar, go to the
 Templates tab, and click on
  Images.
 - Double-click on Image Menu card Charles Farmer to open.
- In the horizontal toolbar, click on
 Clipboard to copy the image and close the file.
 - Go back to the menu card.
- Insert the image by clicking on the large image frame. In the bottom right hand corner, click on and select Clipboard to insert the image.
- To insert a second image, select the second miniature frame first.
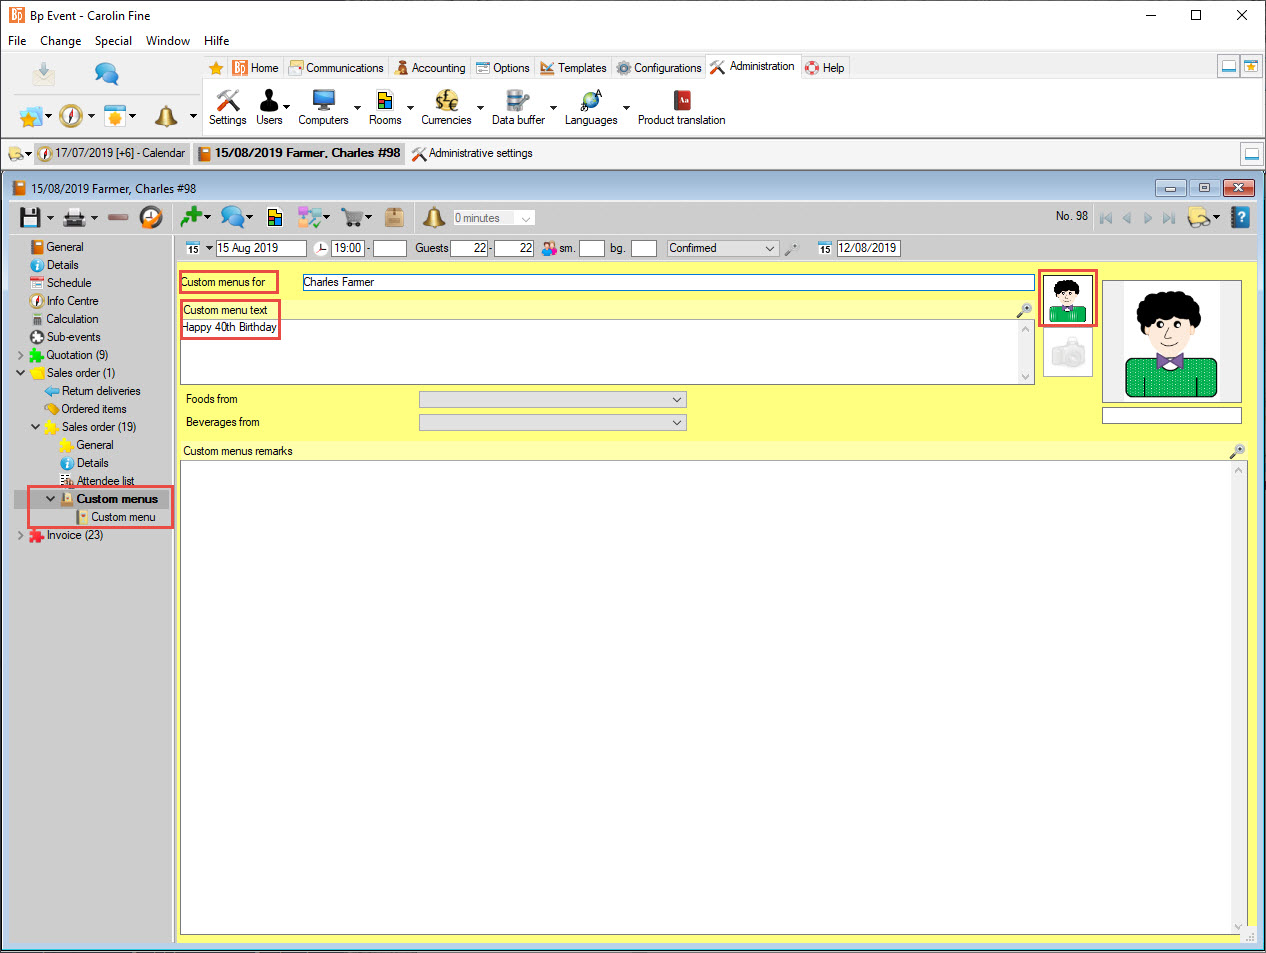
3. Print the menu card
- Double-click on Custom menus to open the menu card layout window.
- The menu card with all the relevant details from the event is generated automatically.
- In the menu card toolbar, go to Print and confirm the prompts to print the menu.
- Close the event by clicking and selecting Save and close.
Aim 6 In-house worksheets for kitchen and service staff
You will learn how to print event sheets for other departments.
Carolin now needs to print out the event sheets containing all the information relevant to kitchen and service staff.
- Open the event.
- In the horizontal toolbar, go to Print >
 Print event sheets > PDF output.
 - Press the CTRL key and left-click Standard Office, Standard Service and Standard Kitchen, then Apply.
- Confirm the prompt with OK to print the selected event sheets containing all the relevant details and information.
Aim 7 Create a final invoice
You will learn how to add an invoice address, create an invoice, add the actual consumption and print the invoice.
Carolin has received the following information by email:
Please address invoice to:
Ms.
Emma Coldwater
14, Mornington Crescent
London
NW1 2JA
UK
Phone: +44 333 240 7480
1. Add the invoice address
- Enter the first few letters of the name in the field Invoice to and press Enter to open a list of matching entries.
- Double-click the account to select Ms. Coldwater as invoice address.
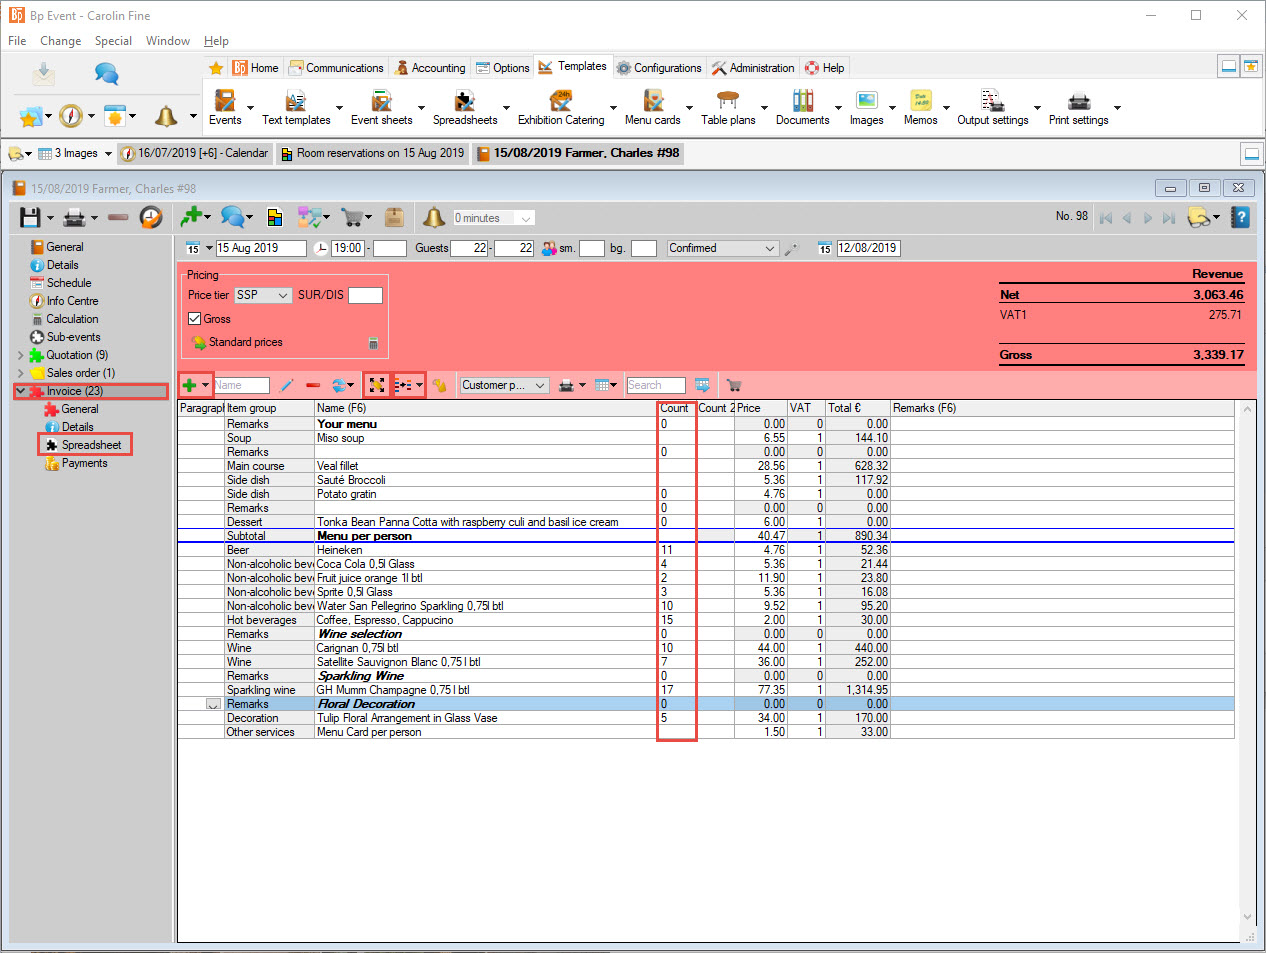
2. Create an invoice
- Left-click the Sales Order and drag it onto the
 Invoice, keeping the mouse button pressed down.
 - In the dialogue box, tick Key data and Items, rename the booking to "Invoice" and click on Copy to open the input window of the invoice, prefilled with all the items from the Sales Order.
3. Add standard beverages
- Select the place where you want to insert the beverages actually consumed during the event and click on the item right above.
- In the search field in the horizontal toolbar, enter the search term "standard" and press Enter.
- Select "Standard Beverages Banquet EXPAND".
- Left-click the combo item and then left-click on in the toolbar to expand it, selecting "Item prices".
4. Enter the actual consumption
Carolin has received the following information form the banquet manager:
Beverage consumption Birthday Party Charles Farmer on 15/MM/YYYY
- GH Mumm Champagne: 17
- White wine: 7 bottles
- Red wine: 10 bottles
- Mineral water: 10 bottles @ 0,75 l
- Coca Cola : 4 glasses @ 0.5 l
- Sprite 3 glasses @ 0.5 l
- Orange juice: 2 bottles @ 1 l
- Beer: 11 Heineken @ 0,3 l
- 15 Coffee
- Enter the figures in the colum "Count".
Hint: Do not enter any amount for items charged per person. - Click on
 Collapse items in the toolbar to remove all items without actual amount or remarks (text items).
5. Print the invoice
- Expand the Invoice menu and left-click
 Spreadsheet.
 - Confirm the prompt by saving the event and click OK to assign an invoice number
- In the toolbar, click on
 Standard and select an invoice template.
 - Click on in the invoice toolbar and confirm with Print.
6. Close the event
- Go to the General tab of the event and change the status to Closed.
- Close the event by clicking and selecting Save and close.
You have now reached all the aims of Tutorial 1: You have ...
... created a new event
... created and sent a booking confirmation to the customer
... created a quotation
... created a sales order and printed a contract
... created a custom menu
... printed in-house worksheets for the kitchen and service staff
... created a final invoice.
Congratulations, well done!