1 1 1 1 1 1 1 1 1 1 Rating 5.00 (1 Vote)
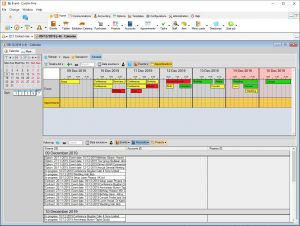
Select a view for your calendar and follow-ups
- Open the calendar tab by left-clicking
 Info Center in the upper left corner quick access pane.
 - In the horizontal toolbar, select the desired view (calendar, timeline, agenda etc).
- Specify the number of days you want to see.
Filter calendar and follow-up data
- Select your
 data sources for the Calender and the Follow-ups displayed in the lower part of the window independently of each other (Events, Appointments, Shifts etc.).
 - Set further
 Filters in the respective data source or switch to other
  lists.
 - Filter for your
 own data only.
 - Save the current settings under Views >
 Save as
  User view,
  Group view or
  Standard view.
 - Create additional IC tabs for various views, important lists etc by going to
 More ... >
  .
.
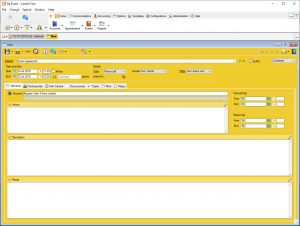
Create a new task
- Go to
 Home >
  Tasks
Tasks >
>  New.
New. - Enter the subject and activate a
 reminder.
 - Assign one or more responsible Users or user groups.
- Start and end dates and times are optional. A task with both both start and end times shows in the calendar, a task without times or start time only shows in the list of follow-ups of the responsible users, provided tasks have been selected as data sources.
- A task shows until the status is changed to completed in either the task pane itself or the reminder pane. Alternatively, right-click the entry in the calendar or follow-ups and select Don't remind again.
 Expand user groups to ensure that each group member is notified of the task, and select Must complete individually if the task needs to be performed not just per group but per recipient.
 Link the task to an
  Account*,
  Event or other record.
Create a new appointment*
- Go to Home >
 Appointments > New.
 - Enter the subject and date and activate a reminder.
- The appointment shows in the calender of all Bp Event users invited to participate, provided appointments have been selected as data sources.
- Right-click the appointment in the calendar toconfirm or
 cancel your participation.
 - Link the appointment to an Event if applicable.
Invite participants to an appointment*
- On the
 Participants tab under Users, enter the participants who have access to Bp Event. Notify these participants of the appointment by either confirming the prompt, or send an
  Internal Message (icon directly above the input window) to all users on the list.
 - In the same window under Participants, enter those participants whose contact details are stored under Accounts (customers, suppliers). Notify these participants of the appointment by sending an
 Email (icon directly above the input window) to all users on the list.
 - Under External Participants, enter all other attendees. Notify these participants of the appointment by going to the Mail tab and entering the email addresses manually in the recipient list.
* Modules: Appointments, CRM plus
Screenshots