Create a new invoice
- Drag your
 Sales orders folder with your left mouse button pressed down onto the
  Invoice folder or create a new invoice by right-clicking Invoice >
  New invoice.
 - If you hav emore than one sales order, choose between one invoice per booking or a collective invoice covering all sales orders.
- Enter a custom name for the invoice or accept the default by clicking OK.
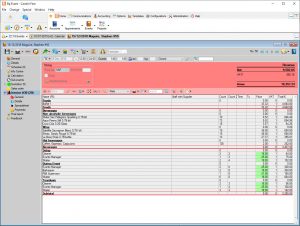
Change or add to invoice data
- In the horizontal tolbar, click

 New to add new
  Items,
  Subtotals or
  Remarks.
 - In the column Count, enter the actual consumption or, in column Count 2, the hours for items charged at an hourly rate.
- Edit prices directly in the Prices column.
 Collapse the list to remove any items with a zero count or without price.
Create an advance invoice
- Right-click Invoice
 New advance invoice.
 - Add the item "Deposit" (create item without price or other details in item group "Others"), enter the amount of the deposit under Price and enter the Count "1".
- Generate the spreadsheet and print or email the document.
- Enter any payments against the advance invoice before assigning the advance incoice to a final invoice.
- Right-click n the final invoice and select Assign open advance invoice to assign both the invoice and any payments to the final invoice..
Create a credit note
- Right-click the faulty invoice and select
 Create new credit note.
 - All items in the booking are copied with a minus sign in front of Count 1.
- Click on
 Spreadsheet and save to generate a consecutive number.
 - From
 Invoive templates, select a "Credit note" template for printing.
Create a collective invoice
- Right-click Invoice > New invoice and enter a custom name or accept the default name.
- Right-click again, select
 Convert to collective invoice and save the event by confirming the prompt. A new entry list will appear at the bottom of the window.
 - Click New in the toolbar of the new entry window to add partial invoices. The partial invoices must have the same invoice address, and belong to the same site and cost centre. Closed or rejected invoices are not eligible.
- Partial invoices created after the collective invoice can be added by right-clicking and selecting
 Add to collective invoice.
 - Select Close collective invoice at the top left-hand corner of the input window.
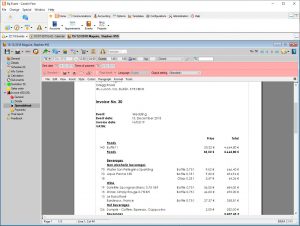
Print the invoice spreadsheet
- Go to Invoice > Spreadsheet and confirm the prompt by clicking Save to create a consecutive invoice number.
- If there is only one standard invoice template, this will be applied automatically.
- Select a different template or one of several standard templates from
 Standard or Invoice templates.
Send the invoice
- Print your invoice by clicking on
 > Print in the horizontal toolbar of the invoice, or save externally in a >
  PDF-Format.
 - Send your invoice as an >
 Email attchment. An email addressed to the invoice address and containing all event and booking references will open automatically.
 - A Customer print, as opposed to a Proof copy, contains a valid invoice date which will impact the dunning run.
Screenshots