Tutorials 2020 / 2021
Tutorial 5
Planning a Conference

Level: Beginners
Duration: 90 to 120 min
The exercise can be saved and paused at any time.
Start Bp Event and log in as
User: Carolin
Password: cf (The password is case sensitive.)
Carolin Fine is an event manager responsible for the organisation and invoicing of events.
Aims and learning outcomes:
- Create an event
- Send a booking confirmation
- Create a quotation
- Create a sales order and send a contract
- Create an event schedule
- Create internal worksheets for the kitchen and floor staff
- Create a final invoice
Aim 1 Create an event
You will learn how to create a booking request with all the relevant details.
Carolin has received the following details:
Date: 12/MM/YYYY of the next month
Time: 09:00 to 17:00
Attendees: 40 to 50
Organiser: Bogdan Calin & Sons Limited
Contact person: Ms Sonia Ellington
Lunch: 12:30 to 14:00
Catering: Conference package
Venue: Conference Room 1
Ms Ellington would like a written confirmation of the reservation (which will be held until just before the event) and a quotation giving the costs.
1. Check room availability on the given date
- Go to the
 Home tab on the top function bar and left-click the little
  "expand" arrow next to
  Events .
 - Left-click the
 Room reservations to open.
 - The input window will open on the current date.
- In the toolbar, change the
 Date to the 12th of the following month. Conference Room 1 is still available.
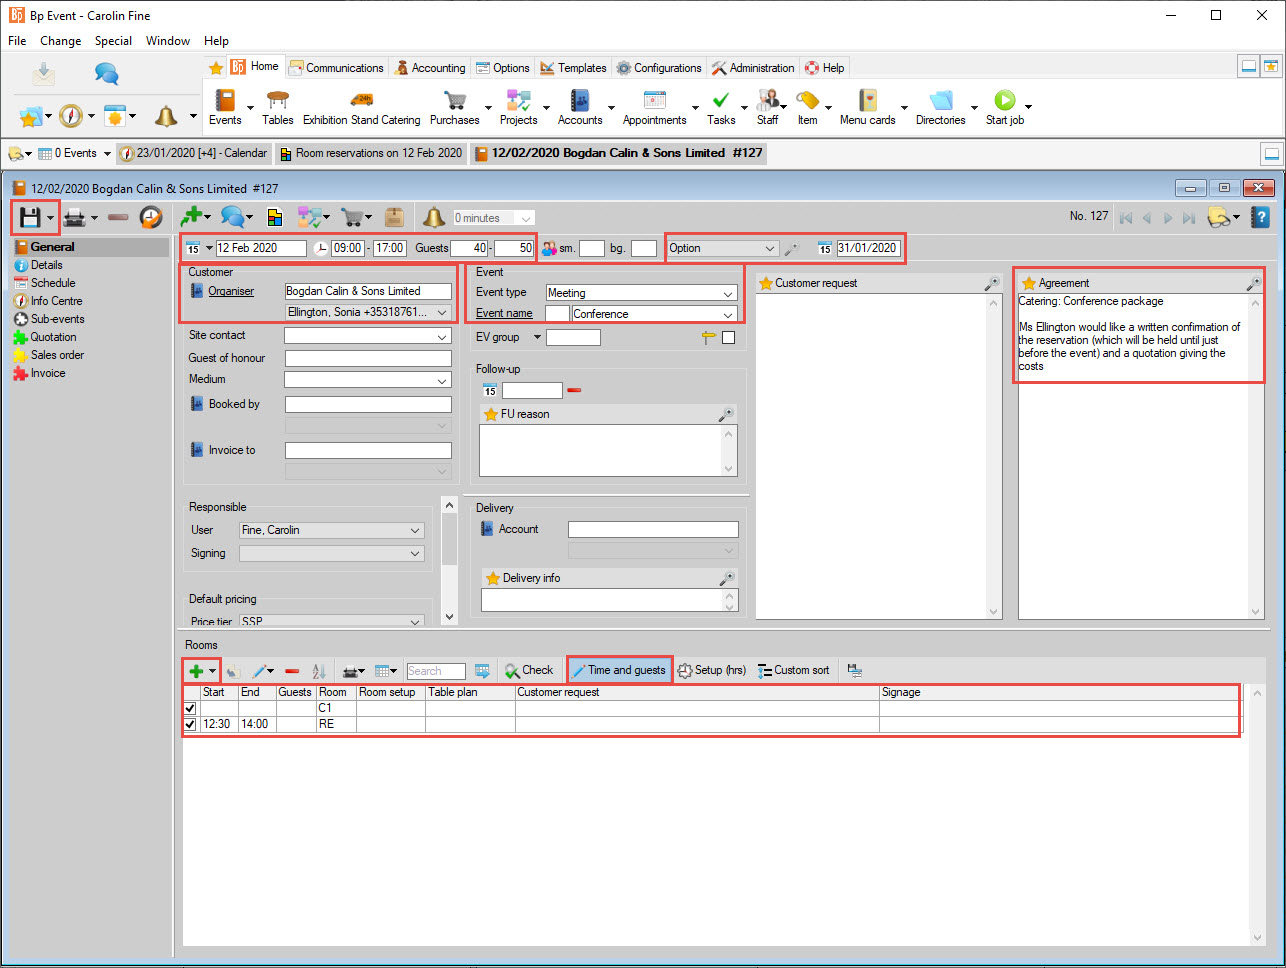
2. Create an event
- Double-click "Conference Room 1" and select
 New to open the input window of an empty event. The date and room are already prefilled.
 - Enter the event details, pressing the tab key to go from field to field. A mouseover will give you a tooltip for the marked field.
- In the top line, select the status Option from the drop-down menu and enter the coming Friday as option date.
- Enter the first few letters of the host's name in the field
 Organiser and press Enter to open a list of matching entries.
 - Double-click the account Bogdan Calin & Sons Limited and select Ms Ellington as organiser contact.
- Select the Event type "Meeting" and Event name "Conference" from the drop-down picklist
- Fill all the mandatory fields before saving your record. Mandatory fields are mostly (but not always) underlined.
- Left-click
 Save in the left-hand corner of the input window to save your data.
3. Add a room
- Under Rooms, select New to add another room for the lunch break.
- Double-click "Restaurant" on the list of rooms.
- Enable
 Times and guests in the toolbar to enter custom times and numbers for each room.
 - Enter the lunch times for the Restaurant (12:30 to 14:00)
Aim 2 Send a booking confirmation
You will learn how to send a booking confirmation listing all the details you have for your event.
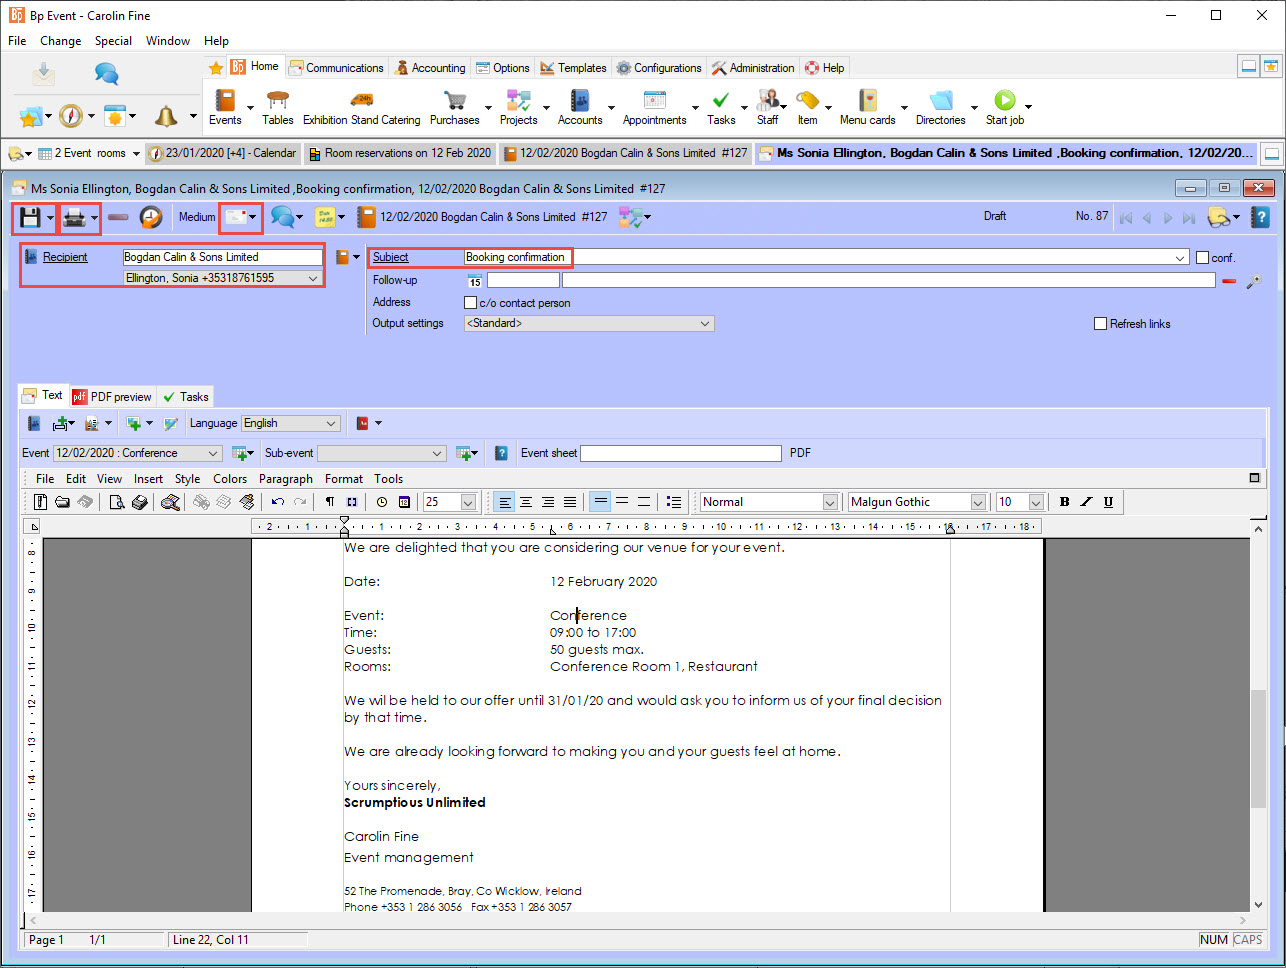
1. Create a new mail
- Ms Ellington's event is still open. In the horizotal toolbar, left-click
 New record and select
  Mail > Ms Ellington and the
  Booking confirmation template.
 - The input window for a new mail or email will open. The address and event details are already prefilled. The body text and formatting are provided by the template.
2. Print the mail in PDF format
- Save the mail in a PDF format with the default letterhead and watermark by left-clicking
 in the horizontal toolbar and selecting Text >
  PDF.
PDF.
Please note: Emails are sent by clicking Send in the toolbar. The school version of the database may not support this feature.
 - Close the mail by clicking and selecting
 Save and close.
3. Save and close the event
Close the event by clicking ![]()
![]() and selecting
and selecting ![]() Save and close.
Save and close.
Aim 3 Create a quotation
You will learn how to search for events, book sales items, extend a confirmation deadline and send a detailed quotation with several options to choose from.
Carolin has received another email:
Dear Ms. Fine,
Thank you very much for your booking confirmation. Please extend the confirmation deadline for another two days.
We will also be needing a beamer and sound system on top of the conference package.
Yours sincerely,
Sonja Ellington
1. Search for Ms Ellington's events
- Go to the Home tab on the top function bar and left-click Events to open the search window.
- Enter the event date and press Enter or click
 Search. Double-click the event to open.
 - Alternatively, go to your list of
 most recent records, either in the left-hand corner of the task bar or under Events and left-click to open.
2. Extend the confirmation date (status date)
The status date reminds you to take action when events are not confirmed in time. Unconfirmed event requests are colour-coded red in the room reservations and calendar.
- Extend the deadline for confirmation by entering the new date in the status date field, or use the date picker if you prefer to use the mouse.
- Left-click save.
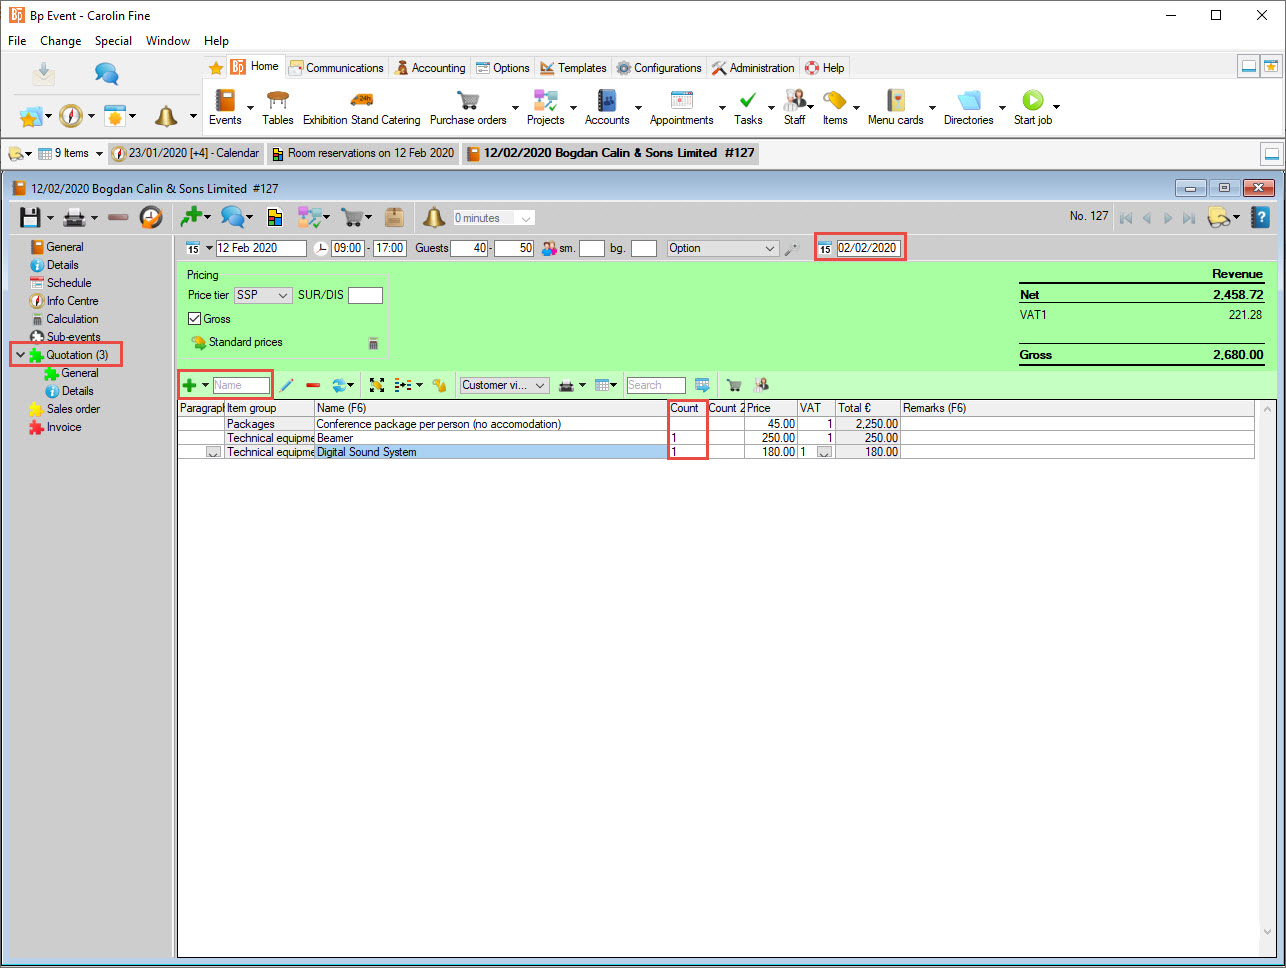
3. Add sales items to your quotation
Every event has three stages: ![]() Quotation,
Quotation, ![]() Sales Order and
Sales Order and ![]() Invoice.
Invoice.
- In the left-hand navigation pane, double-click
 Quotation to open a new empty booking and confirm the default name "Quotation".
 - Add sales items by clicking , entering the search term "Conference" and pressing Enter or clicking Search.
- A list with matching sales items will open.
- Left-click "Conference package per person (no accommodation)" and
 Apply.
 - Add the Technical items by clicking on , selecting the item group "Technical equipment" and Search.
- Press Ctrl and left-click "Beamer per day" and "Digital Sound System" to select, then click Apply
Hint: If you know already which item you are looking for, go to the match field next to the New button and press Enter to submit your search. - In the column Count, enter "1" for the beamer and sound system.
- Left-click to save your event.
4. Remove or change the position of an item
- Remove an item from your Quotation by left-clicking it and clicking
 Delete in the toolbar.
 - Change the order of items by left-clicking the item, pressing Alt and dragging the item to the desired position. The selected item is always inserted below the marked row.
- Left-click to save your event.
5. Print the quotation
After adding all requested items, print a customer copy of the quotation.
- Click on > Mail > Ms Ellington > Quotation.
- The quotation will be automatically generated from the data you entered. Print or Send by email as required.
Aim 4 Create a sales order and print a contract
You will learn how to change the event status, change the number of attendees, create a sales order with added items and print a contract.
Carolin has received the following information by phone:
Attendees: 46
Conference ends: 18:00
Invoice address: Ballaugh Motors Limited Killarney
Lunch: Buffet
Remarks: champagne reception at the end, please confirm in writing
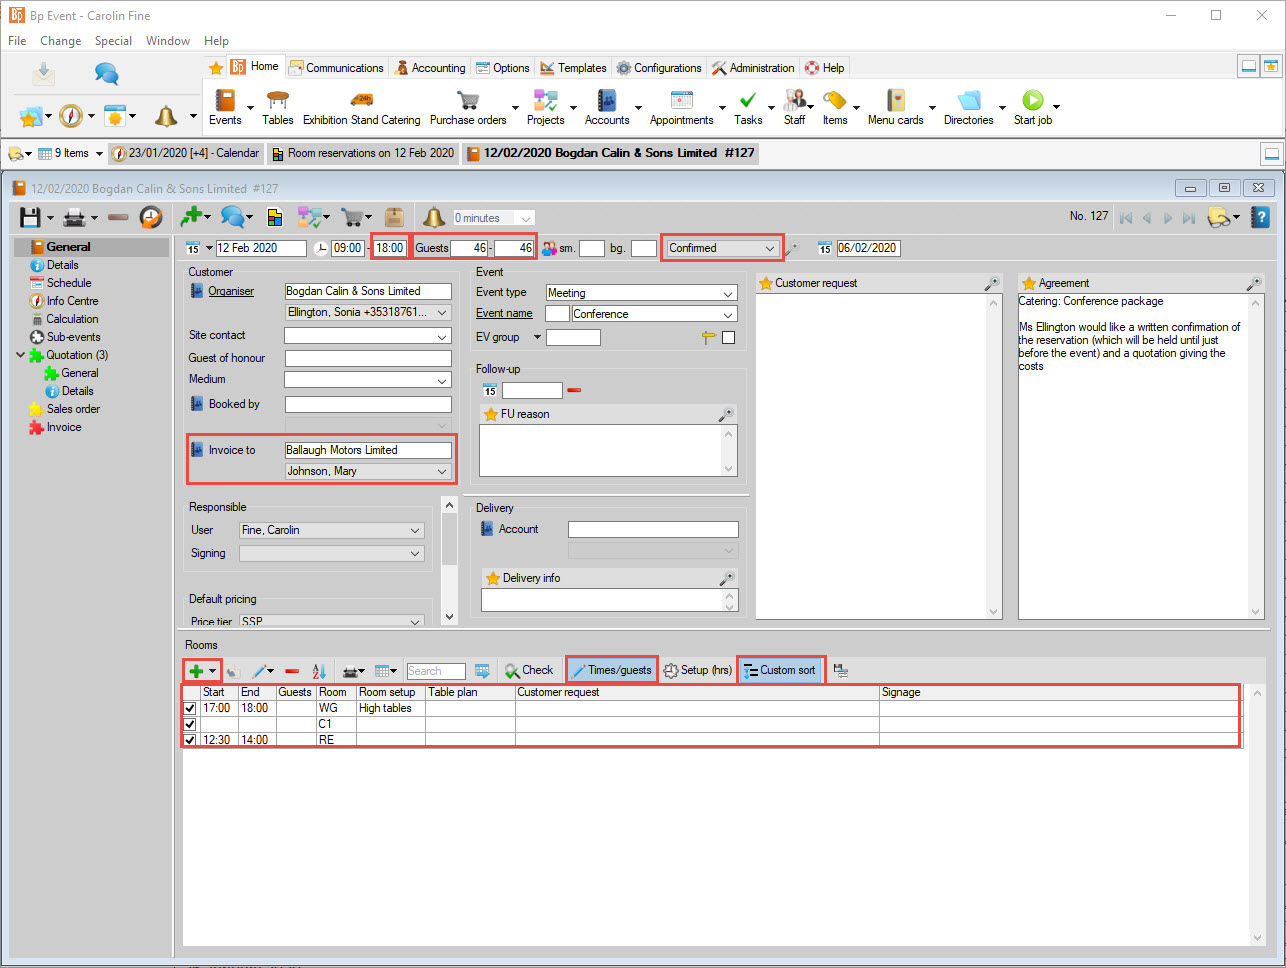
1. Change the event times
- Find and open the event.
- Change the end time to 18:00.
- Change the number of attendees to 46.
- Change the event status from Option to Confirmed.
2. Add an invoice address
- Enter the first few letters of the invoice address name in the field Invoice to and press Enter to open a list of matching entries.
- Double-click the account Ballaugh Motors Limited and select Ms Mary Johnson as contact.
3. Add a room for the champagne reception
- In the "Rooms" list, select New to add another room for the champagne reception.
- Double-click the Winter Garden on the list of rooms.
- Enter the exact times (17:00 to 18:00)
- Select Room setup > High tables.
- Enable Custom sort to sort rooms chronologically.
- Left-click to save your event.
4. Create a sales order
- Left-click the Quotation and drag it onto the
 Sales order icon.
 - Tick Key data and Items, rename the booking to "Sales Order" and click on Copy to create a new sales order.
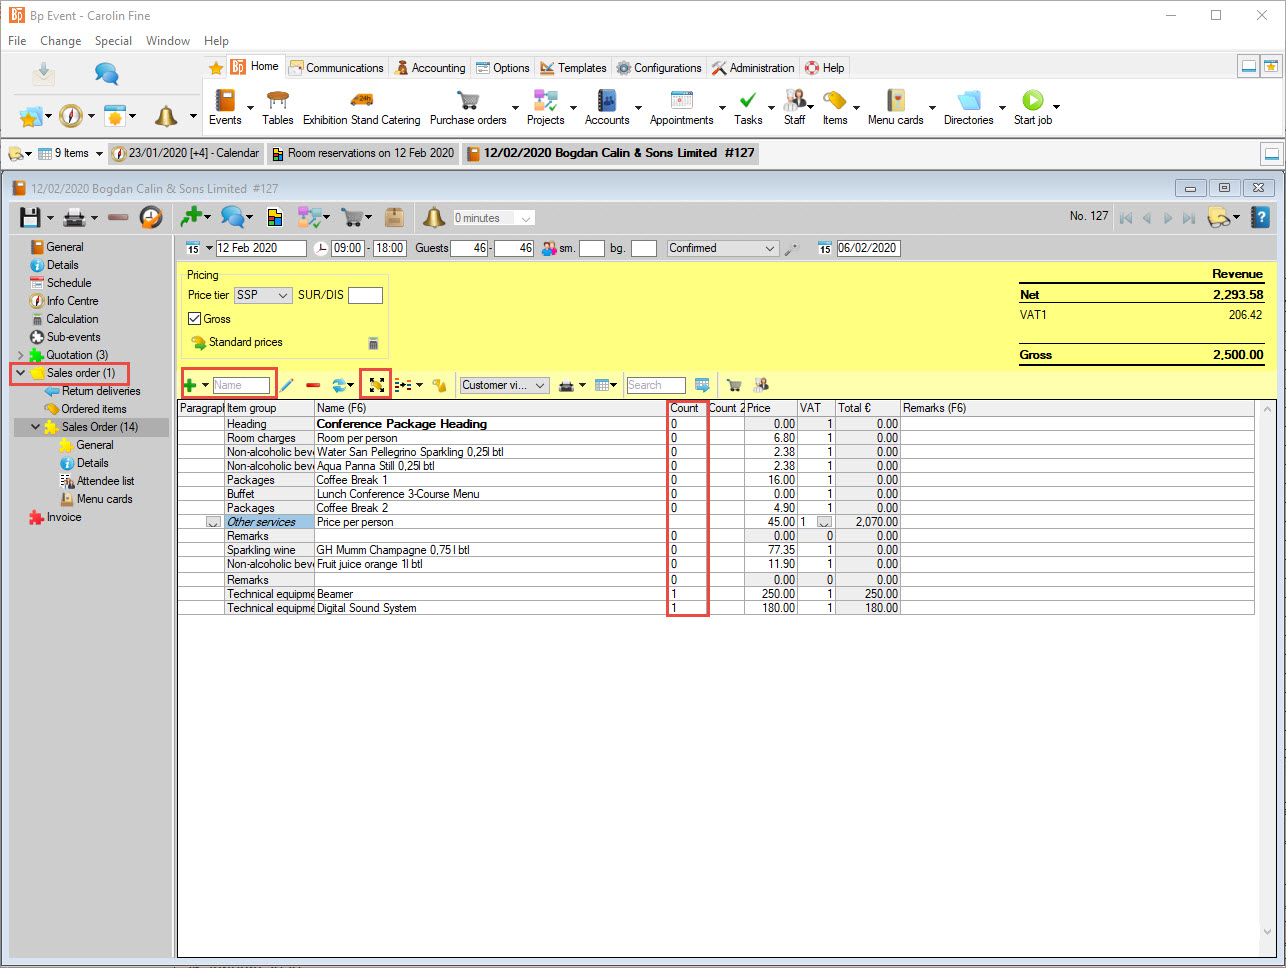
5. Delete or modify items
- In order to enter the customer requirements, you will need to expand the package to show the individual components.
- Select the item Conference package (no accommodation) and click on
 expand, then opt for Package prices.
 - Select any rejected items (Lunch (Conference) Set Menu and remarks line "or") by left-clicking with a pressed Ctrl key, then click delete.
- Add GH Mumm Champagne 0.75l and Orange Juice 1l for the champagne reception.
6. Modify the item count
- Enter a "0" count to list prices per unit for items like wine or aperitif, as the exact amount needed is as yet unknown. In this example, enter "0" for the champagne and orange juice.
- Enter a suitable number for items that are charged per piece but not directly related to the number of guests. Here, enter "1" for the beamer and sound system.
- Leave the cell completely empty for items like food to apply the maximum number of guests automatically, inn this case for the price per person.
7. Apply formatting for improved readability
- Insert an empty remarks line by selecting the line Price per person and pressing F5. Repeat as needed.
- Drag the line into a different position by left-clicking and keeping the Alt key pressed down.
8. Print the quotation
After adding all requested items, print a customer copy of the quotation.
- Click on > Mail > Ms Ellington > Quotation/Confirmation.
- The contract will be automatically generated from the data you entered. Print or Send by email as required.
9. Create a follow-up
Create a reminder one week prior to the event.
- Go to the General tab of the event.
- Enter 05/MM/YYYY in the Follow-up field.
- In the Follow-up Reason field, enter "Finalise schedule".
10. Change the event status
Ms Ellinton has returned the signed contract to Carolin.
- Open the event.
- Change the status from Confirmed to Contract.
- Close the event by clicking and selecting Save and close.
Aim 5 Create an event schedule
You will learn how to create a detailed timeline for the event and add specific instructions for other departments.
1. Go to Follow-ups and open the event
This is one week before the event.
- Press F8 to open the Info Centre.
- Use the date picker in the upper left-hand corner to open the date one week before the event.
- The event will show in the lower part of the window under "Follow-ups".
- Double-click to open the event.
Carolin has received the following information by phone:
No strong spirits to be served
Some good eaters in the group, provide generous portions and plenty of choice
Conference times: 09:00 to 17:00
Morning coffee break: 10:30 to 10:50 (biscuits)
Lunch break:12:30 to 14:00
Afternoon coffee break: 15:30 to 15:50 (pastry)
Informal get-together: 17:00 to 18:00 (champagne)
2. Add detailed instructions for different departments
- In the left-hand navigation pane, click on Sales orderand open
 Details.
 - Enter the information on not serving spirits and offering a plentiful choice as Service notes and Kitchen notes respectively.
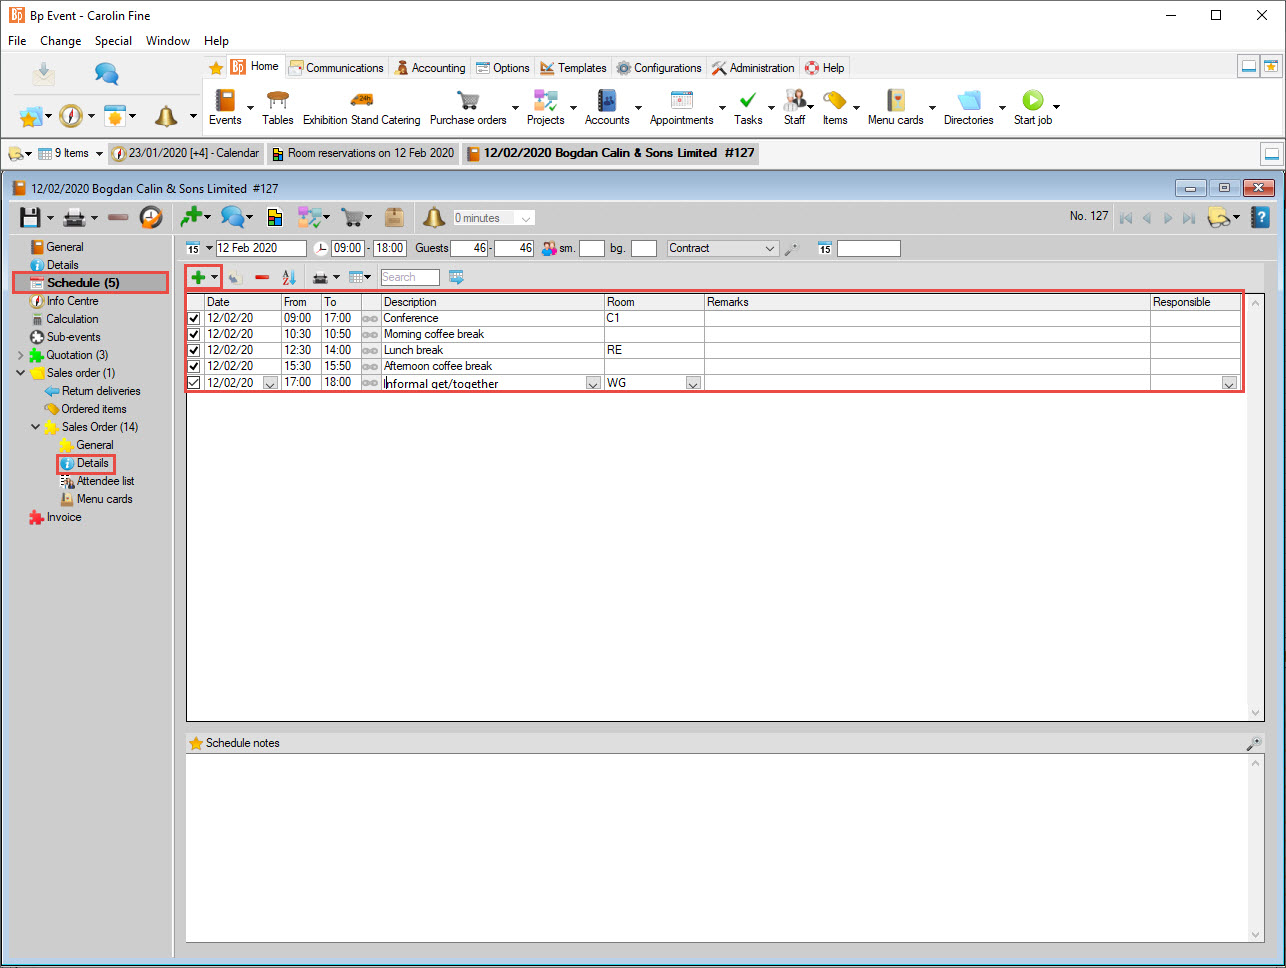
3. Enter a detailed event schedule
- the left-hand navigation pane, left-click
 Schedule to enter a detailed timeline.
 - Left-click New to add a new schedule entry.
- The Date is automatically filled with the event date. Add the Start and End times, a Description and Location (if applicable).
Aim 6 Print work instructions for kitchen and service staff
You will learn how to print worksheets for other departments.
In order to pass on the relevant information to all the departments involved, Caroline needs to print our worksheets for the kitchen and service staff.
- Open the event.
- In the horizontal toolbar, click on Print >
 Print event sheets > PDF output. Left-click Standard Office, Standard Service and Standard Kitchen, keeping the Ctrl key pressed down, then click Apply.
 - Click OK to confirm and print the selected event sheets with all relevant data.
Aim 7 Create a final invoice
You will learn how to create an invoice, add the actual consumption and print the invoice.
1. Create an invoice
- Left-click the Sales Order and drag it onto the
 Invoice, keeping the mouse button pressed down.
 - In the dialogue box, tick Remarks and Subtotal to open the input window of the invoice, prefilled with all the items from the Sales Order.
2. Enter the actual consumption
Carolin has received the following information form the banquet manager:
Beverage consumpion Conference Bogdan Calin & Sons Limited on 12 DD, YYYY
Champagne: 12 bottles
Orange juice: 2 jugs
- Enter the figures in the colum "Count".
Hint: Do not enter any amount for items charged per person. - Click on
 Collapse items in the toolbar to remove all items without actual amount or remarks (text items).
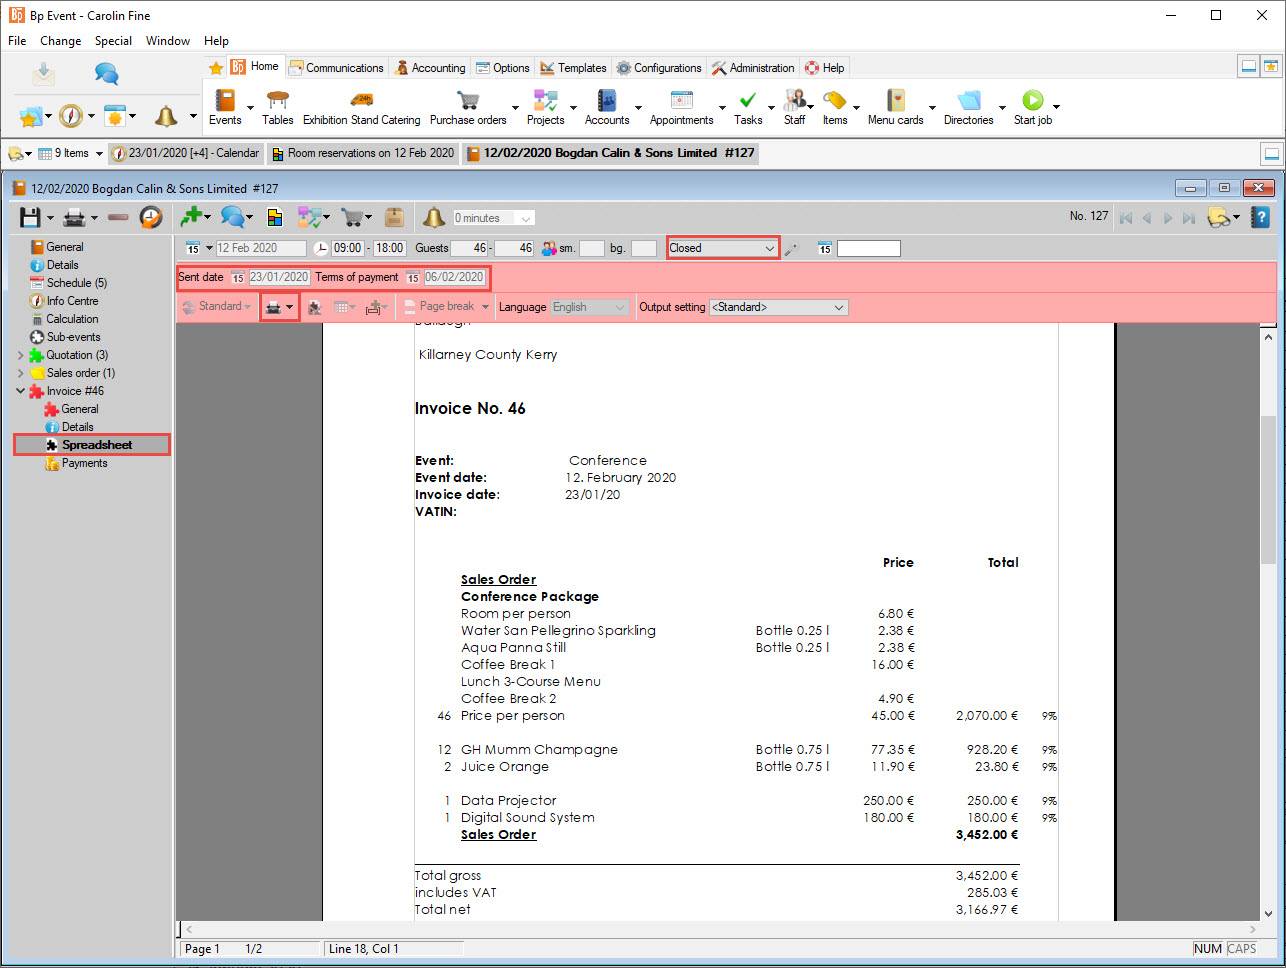
3. Print the invoice
- Expand the Invoice menu and left-click
 Spreadsheet.
 - Confirm the prompt by saving the event and click OK to assign an invoice number.
- Click on in the invoice toolbar and confirm with Print.
4. Close the event
- Go to the General tab of the event and change the status to Closed.
- Close the event by clicking and selecting Save and close.
You have now reached all the aims of Tutorial 5: You have ...
... created a new event
... sent a confirmation to the customer
... created a quotation
... created a sales order and printed a contract
... created an event schedule
... printed internal worksheets for the kitchen and floor staff
... created a final invoice.
Congratulations, good job!