Tutorials 2020 / 2021
Tutorial 6
Organising an Outside Catering

Level: Advanced
Duration: 90 to 120 min
The exercise can be saved and paused at any time.
Start Bp Event and log in as
User: Carolin
Password: cf
Carolin Fine is an event manager responsible for the organisation and invoicing of events.
Aims and learning outcomes:
- Create an event using a template
- Create a quotation
- Create an event schedule
- Create a sales order and print a contract
- Create a custom menu card
- Create internal worksheets for kitchen and service staff
- Create a final invoice
Aim 1 Create an event using a template
You will learn how to find a customer account, verify data and create an event using a template.
Carolin has received the following email:
Dear Ms Fine,
We are planning to celebrate our 50th company anniversary with an on-site event for our customers and business partners. The prospective date for this is 15 October YYYY.
We are expecting an estimated 180-200 guests.
Please be good enough to submit a quotation for catering, decorations, staff and social programme at your earliest. The celebration is scheduled to start around 16:30 with a champagne reception and fingerfood, followed by speeches and presentations up until 18:30. A more detailed programme will be available closer to the event. We expect the party to end around 02:00 on the following morning.
From our previous experience of your excellent service, we are looking forward to working with you again.
Please don't hesitate to contact me for further questions under +44 (0) 1829 773166.
Yours sincerely,
Laser Physics UK Ltd
Dr. Martin Brown
Golborne Lodge Technology Centre
Building C, Staircase X
Whitchurch Road
CH3 9DR Milton Green, CheshirePhone +44 (0) 1829 773166
1. Open the account
- Go to
 Home >
  Accounts
 >
>  Search> Accounts to open the search pane.
 - Alternatively, use the F10 hotkey.
- Enter the first few letters in the Name field and press the Enter key to confirm.
- Double-click the required account to open.
- Verify if all the contact details are up-to-date and change if necessary.
 Save your changes.
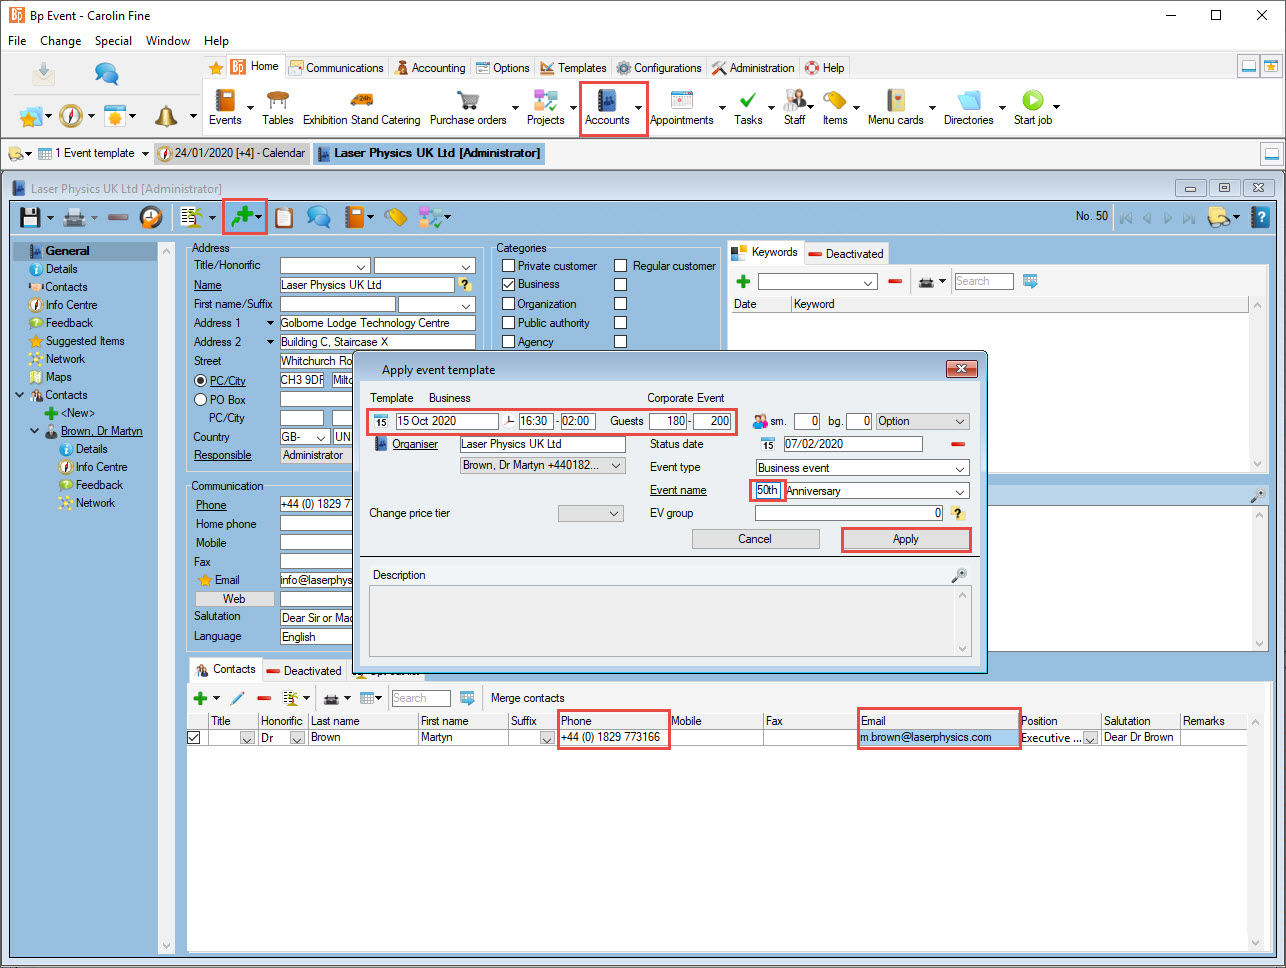
2. Create an event using a template
- Go to
 New >
New >  Event >
  Brown, Dr. Martin in the horizontal toolbar of the still open account.
 - Click on
 New from template and select the
  Corporate Event template to open.
 - Enter the details from the email. Use the tab key to move from one input field to the next.
Please note: Tooltips will pop up on mouse-hover. - Both the names of the Organiser and Contact person have already been pre-filled.
- Enter the Event name by typing "50th" in the small numeral field and selecting "Anniversary" from the drop-down list in the second, larger field.
- Apply your changes to open the input window of the event proper with all the previously entered details.
- Enter any additional information from the email in the field Customer request on the right-hand side.
 Save and close the event.

Aim 2 Create a quotation
You will learn to search for an existing event, change booked items from the template and send a detailed quotation, giving your customer a choice of different options.
Carolin has received the following email:
Dear Ms Fine,
Please send a quotation for different types of buffets including a limited selection of wines and all other related costs. We are also planning to offer an aperitif and fingerfood during the welcome reception.
Yours sincerely,
Laser Physics UK Ltd
Dr. Martin Brown
Golborne Lodge Technology Centre
Building C, Staircase X
Whitchurch Road
CH3 9DR Milton Green, Cheshire
1. Find and open the event again
- Go to Home > Events> Search > Events, enter the event date and click Search.
- Double-click the requested event in the list of search results to open.
- Alternatively, open the event from your list of
 Recently opened records.
2. Verify the booked items
The selected template contains all the standard sales items offered for corporate events, you will only need to add any special requests.
- Click on
 Quotationto open a list of
  Sub-events and to see which items have so far been booked.
 - Check if all sub-events are complete.
3. Change booked items
- Add an item by clicking on New and pressing Enter.
- Insert the required item by left-clicking it on the list of search results.
Please note: If there is only one matching item, it will be inserted directly. - Remove items by left-clicking first the item and then
 Delete in the horizontal toolbar. Keep the Ctrl key pressed down to select mulitple items.
 - Enter the following changes:
a) In the sub-event Welcome, replace "GH Mumm Champagne 0.75l btk" by "Champagne Cocktail".
b) Right-click the Quotation folder to create a New quotation called "Decorations", and add "Floral Arrangement in Glass Vase Table Decoration". - Change the order of items by selecting the item with the Alt key pressed down and dragging it to the line above the desired position.
- Save the event.
4. Print the quotation
When you are satisfied that all requested items have been booked and double-checked, print and send the quotation to your customer.
- In the horizontal toolbar, click on New >
 Mail > Dr. Martin Brown>
  Quotation.
The new mail will open with all known organiser and event details already pre-filled. The body text as well as formatting are provided by the letter template.
Quotation.
The new mail will open with all known organiser and event details already pre-filled. The body text as well as formatting are provided by the letter template.
 Print in a
  PDF format for mailing
- Send the quotation by email by clicking
 Cover letter and selecting new cover letter. The quotation will be attached as a PDF document.

Aim 3 Create an event schedule
You will learn how to create an event schedule with fron-of-house and back-of-house information, containing details and responsible staff members.
Carolin has received the following information by phone:
The Managing Director will give a thirty-minute speech during the welcome reception (while the aperitif is being served).
To be followed by a video/slide show covering the company history (approx. 45 min).
Management will declared the buffet open around 19:00
The buffet, excepting the dessert buffet, can be cleared as of 21:30.
The social programme will start around 21:30.
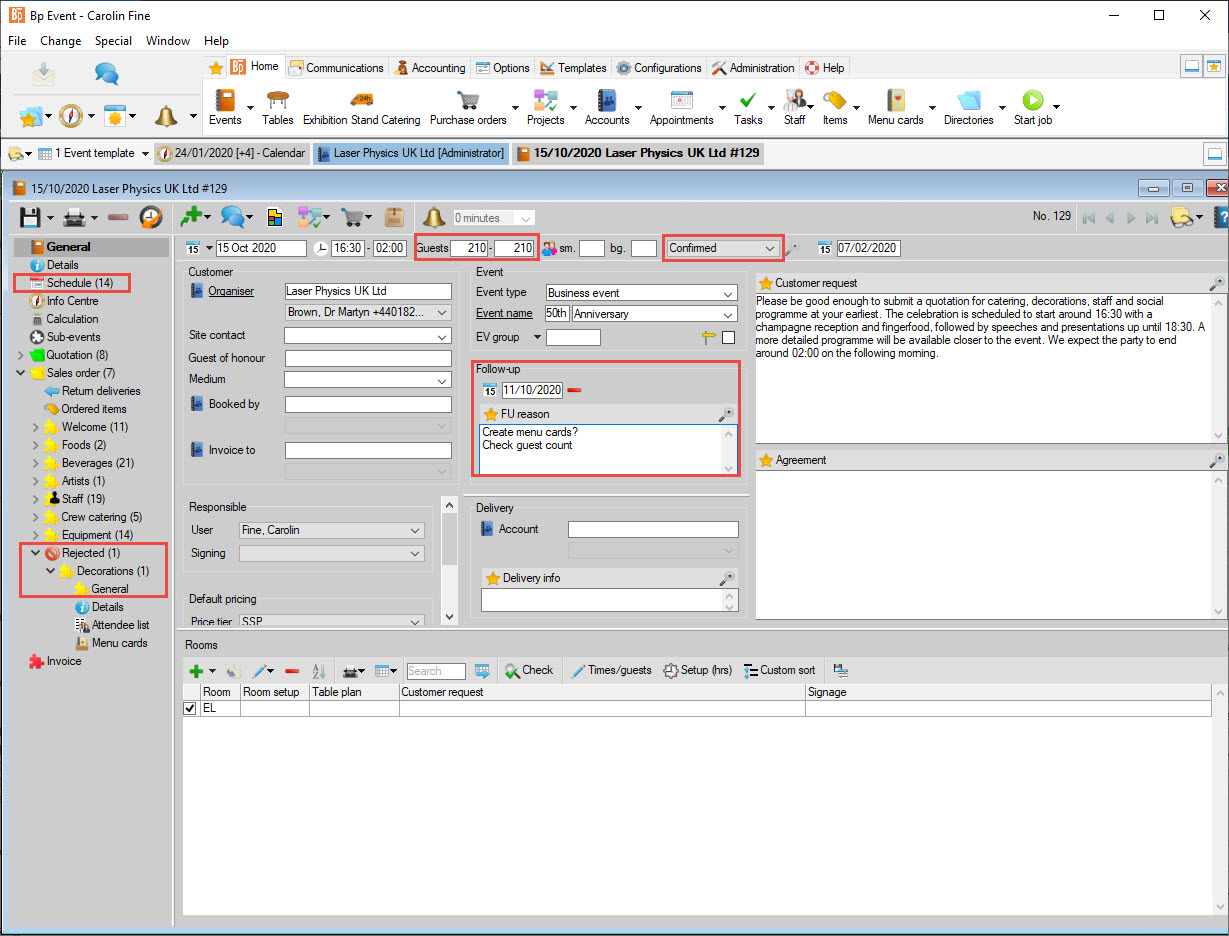
Create an event schedule
The schedule reflects an exact timeline of the entire event. Front-of-house (external) and back-of-house (external) details will appear on respective print-outs. All schedule items are by default marked as external, deactivate the checkbox in the first column of the schedule to flag lines as internal info only.
- Open the
 Schedule in the left-hand navigation pane.
 - The schedule has already been pre-filled with suggestions from the event template.
- Change the times to match the ones given in the phone call.
- All schedule items are by default external (front-of-house). To mark them as for internal use only, untick the checkbox in the first colum.
Please note: Internal schedule items appear on worksheets for internal departments, not on quotations, contracts or invoices intended for the customer. - Delete items by selecting them and clicking in the toolbar. To select multiple lines, keep the Control key pressed down while left-clicking the desired items.
- Add the following items to the schedule:
a) Internal: Final venue check at 15:00 - Responsible: Service staff
b) External: Flowers delivered at 14:00 - Responsible: Service staff - Save your event.
Aim 4 Create a sales order and print a contract
You will learn how to change the event status, create a sales order, reject a sub-event and change booked items.
Carolin has received the following information by phone:
The event has now been confirmed
210 guests
Wine as quoted
Flower decorations provided by customer
Buffet 3
DJ
1. Change the event status
- Find and open the event again.
- In the horizontal toolbar, change the event status from Option to Confirmed.
- Enter the new guest count.
2. Create a sales order
- Drag-and-drop the Quotations folder onto the
 Sales order.folder to copy all the data completely.
 - Confirm the prompt by clicking Copy.
3. Change the required items
- Delete all rejected items by selecting them with the Control key pressed down.
- Effect any other changes as indicated above.
4. Double-check the number of items
- Enter an item count of "0" for items quoted per piece, but in an as yet unknown quantity. These items, such as wine or spirits, will be invoiced on the basis of actual consumption.
- Enter an item count of "1" or any other appropriate number for items quoted per piece with an already known amount, such as the DJ.
- Leave the amount empty for items charged per person (maximum number of expected guests), such as the buffet.
5. Reject the sub-event "Decorations"
The customers have decided to take care of decorations themselves.
- Expand the sub-event
 Decorations in in the left-hand navigation pane and go to the Main tab.
 - In the top line, change the status from "Confirmed" to "Rejected" and Confirm.
6. Print the contract
When you have booked and checked all items, create and print or send the customer contract.
- In the horizontal toolbar, click on New > Mail > Dr. Martin Brown> Confirmation.
- The new mail will open with all known organiser and event details already pre-filled. The body text as well as formatting are provided by the letter template.
- Print in a PDF format for mailing
- Send the quotation by email by clicking Cover letter and selecting new cover letter. The quotation will be attached as a PDF document.
7. Create a follow-up
Create a follow-up for your calendar to be reminded to call for final arrangements four days before the event.
- Go to the General tab of the event.
- Enter a date for the Follow-up, in this case 11 October YYYY.
- Select a Reason for the follow-up from the list of
 Favourites by pressing the Control key and selecting
a) Create menu cards?
b) Check guest count.
or add text manually. - Save and close the event.
8. Change the event status
Dr. Brown has returned the signed contract to Carolin.
- Open the event.
- Change the status from Confirmed to Contract.
- Save and close the event.
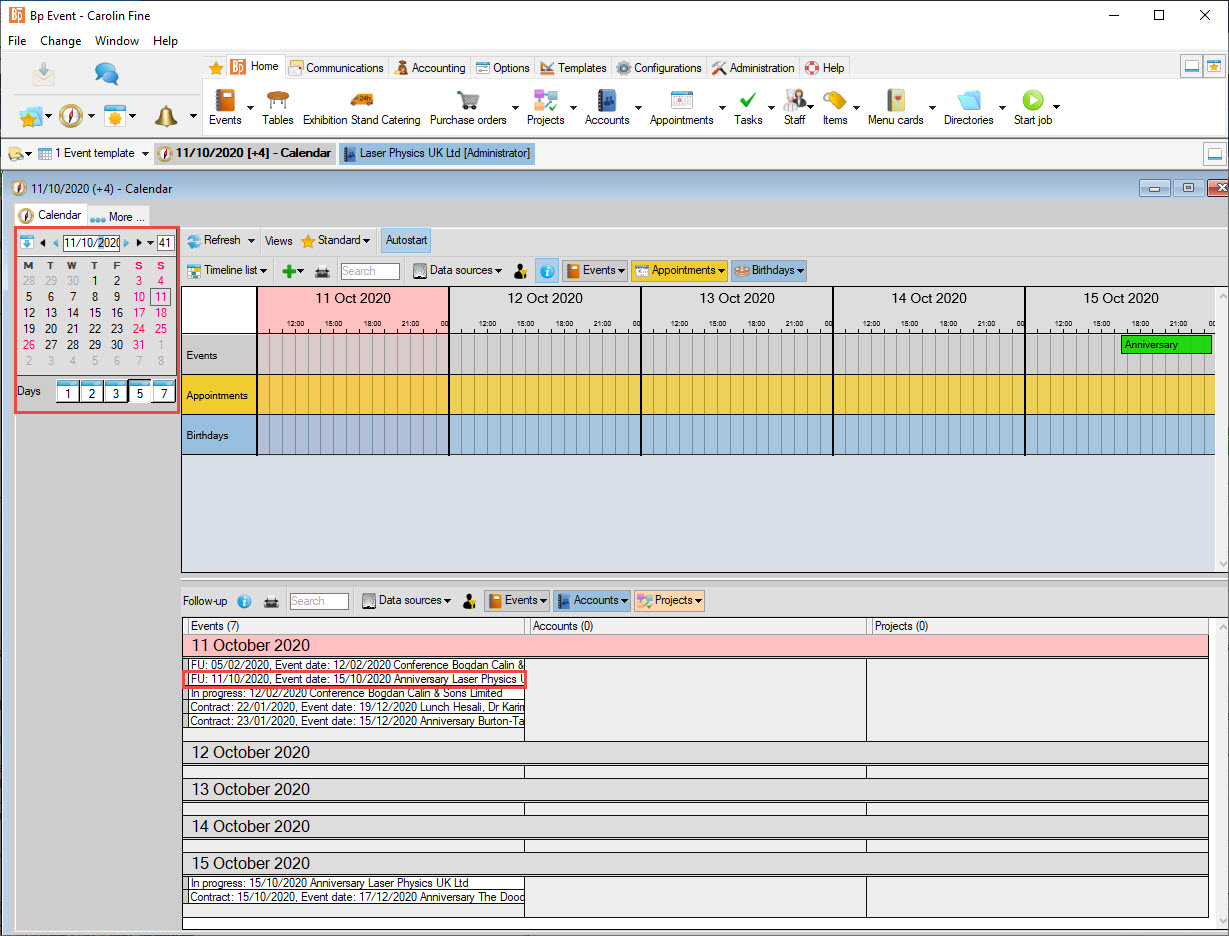
9. Go to 11 October YYYY
Assuming that this is 11 October YYYY, go to the Info Centre for today.
- Press F8 to open the Info Centre.
- Enter the date 11/10/YYYY to open the calendar and list of follow-up for that date.
- You will be reminded of the event and missing information in the list of folow-ups in the bottom part of the window.
- Double-click the reminder to open the event.
10. Change the number of people
- Change the number of people to 210 people in the event's horizontal toolbar.
- Delete the follow-up, as all details have now been submitted.
Aim 5: Create a custom menu card
You will learn how to create and print a custom menu card with an image.
Carolin has received the following information by phone:
Menu card copy: Celebrating 50 years in business!
For the logo, please refer to the customer account of Dr. Martin Brown.
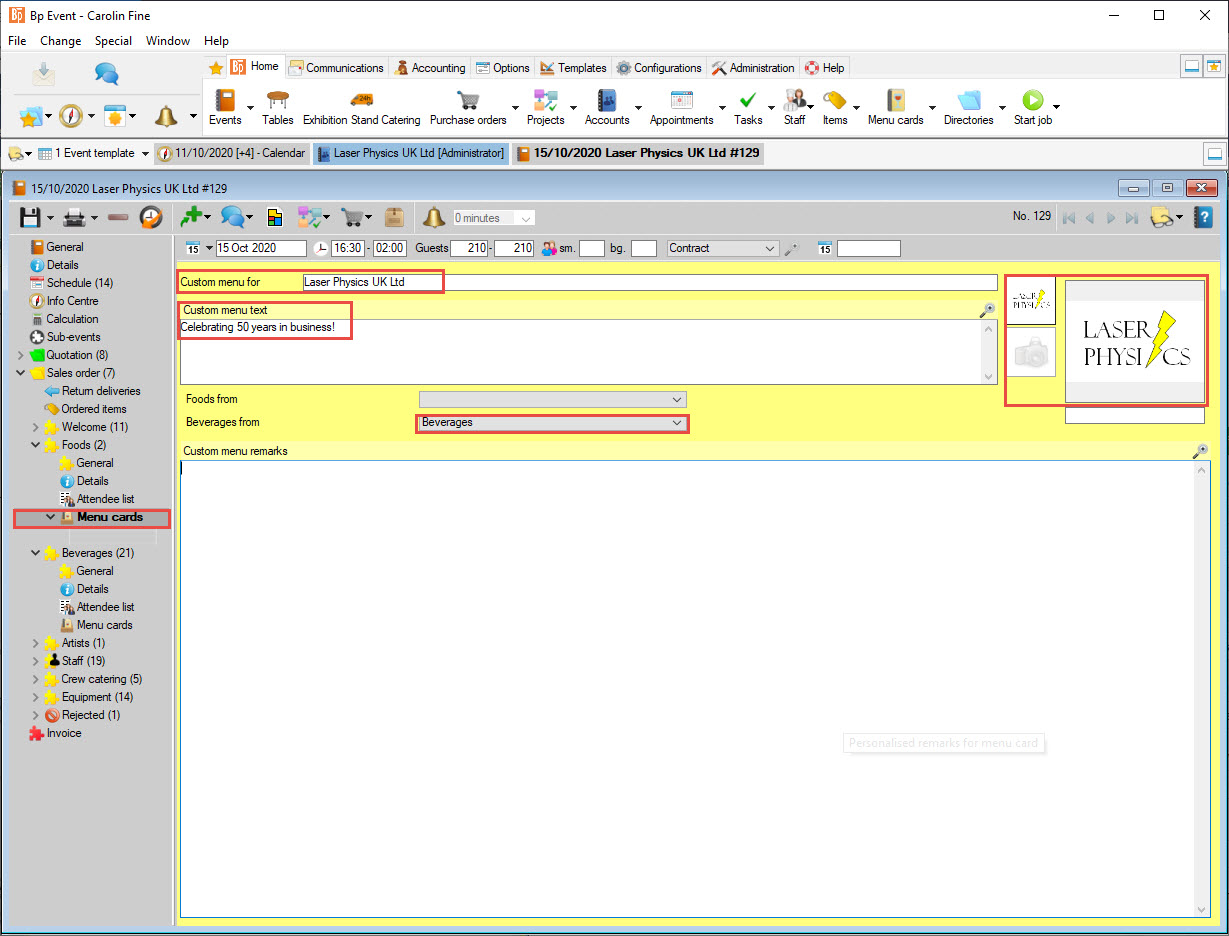
1. Enter the custom text
- Expand the sub-event Sales orders in in the left-hand navigation pane and then expand the sub-event Food.
- Left-click
 Custom menus.
Please note: Custom menu cards can only be created at the "Order" stage of processing. - Enter "Laser Physics UK Ltd" as Custom menu for and "Celebrating 50 years in business!" as Custom menu text
- Select the sub-event "Beverages" for Beverages from.
2. Add an image
- Open the customer account.
- In the left-hand navigation pane, go to
 Details.
 - Select the logo and press Ctrl+C to copy it to the clipboard.
- Return to the event and custom menu card.
- Insert the image in the custom menu by first selecting the upper small photo frame in the upper right-hand corner of the input window.
- Then click New in the larger photo frame next to it.
- Select
 Clipboard to insert the logo.
3. Print the menu card
- Double-click Menu cards to open a new menu card with the selected food and beverage items, text and image.
- The menu card will be created automatically based on the template.
- Print the menu
- Save and close the event.
Aim 6 Create internal worksheets for kitchen and service staff
You will learn how to create, print and share internal worksheets for other departments
Carolin now needs to share the details she has with the other departments involved by printing out worksheets for the kitchen and service staff.
- Open the event.
- In the horizontal toolbar, click Print >
 Print event sheets > PDF Output, and press the Ctrl key to select Standard Office, Standard Service and Standard Kitchen, then
  Apply.
 - Confirm the prompt by clicking Copy.
- The work instructions are created and printed with all the data needed by the selected departments.
- Save and close the event.
Aim 7 Create a final invoice
You will learn how to add a different invoice address to an account, enter the actual consumption of consumable items and create a final invoice.
Carolin has received the following email:
The invoice address is different from the organiser address:
Laser Physics Dublin Ltd
Mr Charles Miller
Ballsbridge Business Park
Building A
Merrion Road
Dublin 4Phone +44 141 647 786321
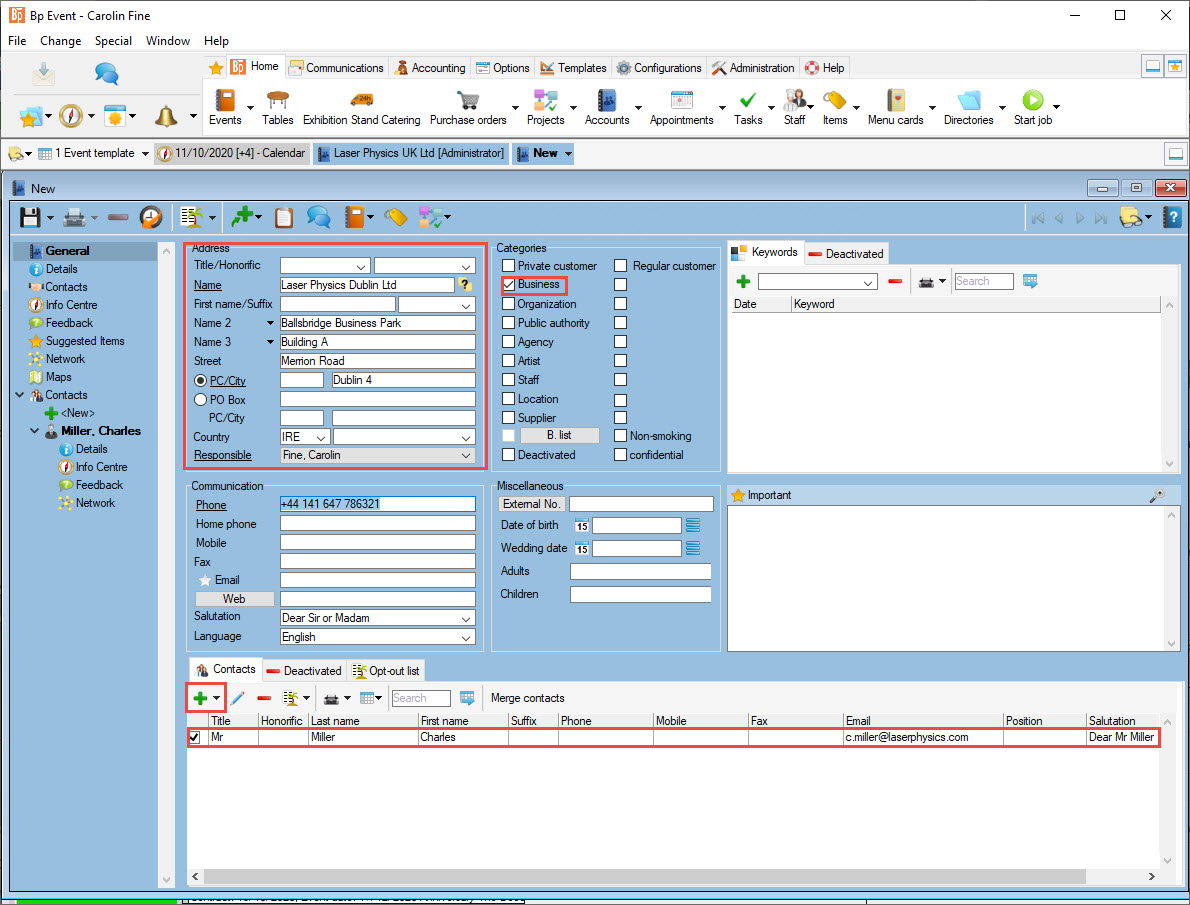
1. Add the invoice address
- Go to the General tab of the event.
- Enter the first few letters of the company name in the field Invoice to and press Enter to open a list of available accounts. The account and contact person given above are not yet available in the database.
- Create a New account with the details given above.
- Assign the categories Company account and Regular guest .
- Save and close the account.
- Select the new account in the list of accounts and confirm by clicking Apply .
- The invoice address will be inserted automatically.
Please note: Only add an invoice address if it is different from the organiser address.
2. Create an invoice
- Drag and drop the sub-events from the Order folder to the
 Invoice folder.
 - Select Collective Invoice.
- Accept the default name „Invoice“ by clicking OK.
- Select Separating text and subtotals for improved readability.
- Opt to Leave open any items counts without a specified amount.
- The input window of the invoice will open with all items from the order.
3. Enter the figures for actual consumption
Carolin has received the following details from the banquet manager:
Beverage consumption Laser Physics, 15 Oct YYYY
187 Champagne Cocktail
11 Satellite Sauvignon Blanc 0.75l btl
31 Shiraz, Simply Rouge 0.75 l btl
11 Le Bosq Rose 0.75 l btl
214 Water San Pellegrino Sparkling 0.75 l btl
180 Aqua Panna Still 0.75 l btl
8 Coca Cola
2 Fruit juice orange 1l btl
17 Heineken
4 Fruit juice apple 0.2 l glass
64 Coffee, Espresso, Cappucino
- Ente the figures in the "Amount" column.
- To delete all items with zero consumption, click
 Collapse. This will also remove any remarks or text lines.
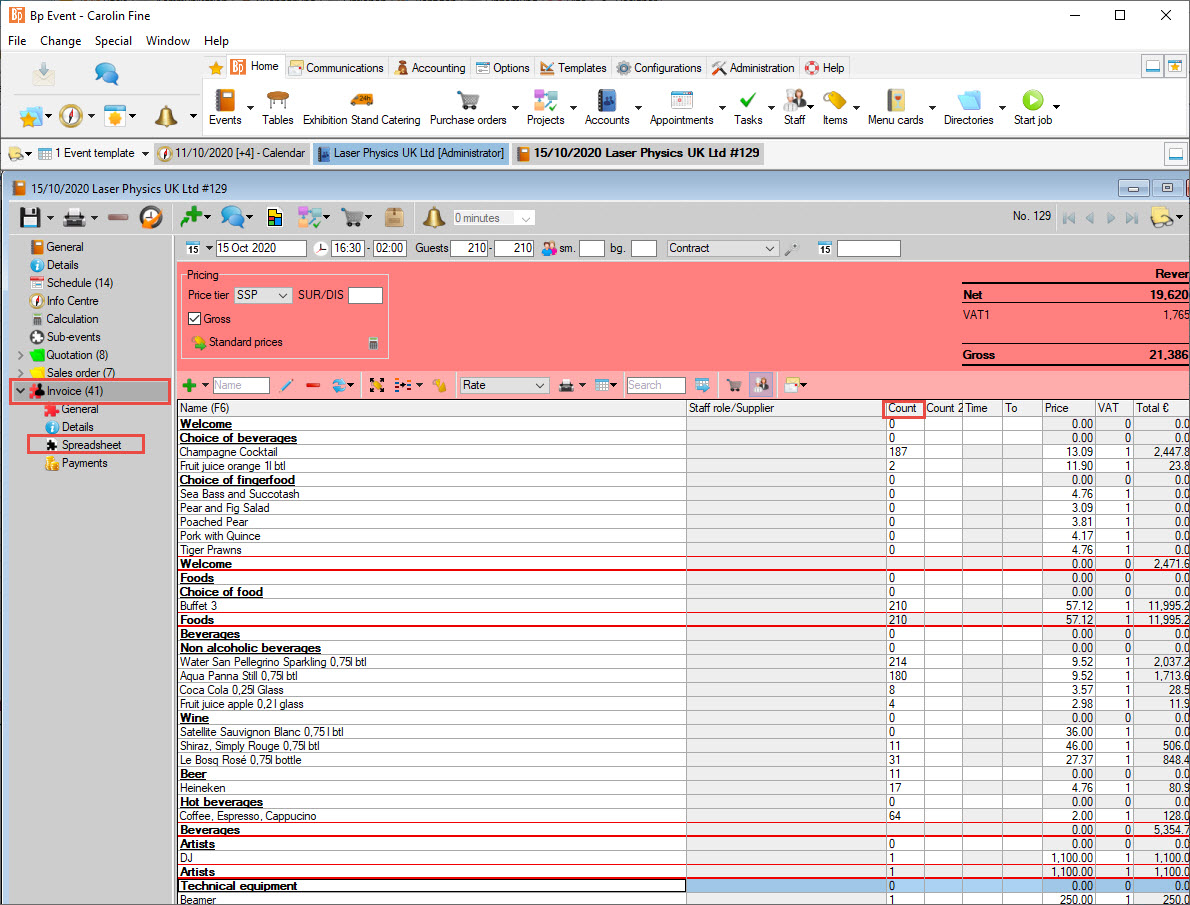
4. Print the invoice
- Expand the
 Invoice and go to
  Spreadsheet.
 - Save the event.
- Confirm that you want to assign a consecutive invoice number by clicking OK.
- Print the invoice.
5. Close the event
- Go to the General tab of the event and change the status to Closed.
- Save and close the event.
You have now reached all the aims of Tutorial 6: You have ...
... created an event using a template
... created a quotation
... created an event schedule
... created a sales order and printed a contract
... created a custom menu card
... created internal worksheets for kitchen and service staff
... created a final invoice.
Congratulations, way to go!