Quick Guides
Creating event schedules and booking links
- Details
- Written by Sylke Helbing
- Category: Quick Guides
- Hits: 316
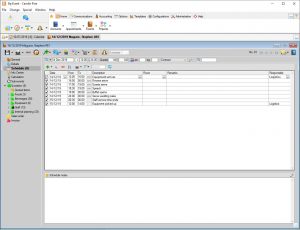
Create a new event schedule*
- In the left-hand event navigation , click on
 Schedule.
 - Left-click
 New above the entry window to create a new schedule entry.
 - For one-day events, the date defaults to the event date.
- For multi-day events, new entries are pre-filled with a "daily" value. Enter a date manually or select one from the list to apply the entry to only one date.
- Schedule items can only be created for the day(s) of the event plus/minus one day for set-up and teardown.
- By default, new entries are checked in the first column and set to appear on customer print-outs.
- If the entry is for internal use only, uncheck the line. The schedule item will then print only on internal prints.
Enter schedule details
- Enter From and To times.
- Under Description, select a name for the entry from the drop-down list or enter a custom name.
- Enter the number of Guests if different from the main event.
- Under Room, select a room from the drop-down list of rooms booked for the event. Custom entries are not possible.
- Add additional Remarks if needed.
- Multiple lines can be changed simultaneously. Select the cells you would like to change (start time, description) by left-clicking with the Ctrl key pressed down. Right-click to open the context menu. Either enter a new value, or, for times, opt to shift the times back or forward by a specified period. Confirm by clicking OK.
 Save the event and event schedule.
Use an event schedule template*
- In the left-hand event navigation, click on Schedule.
- Left-click

 >
>  New from template to open a selection of available events with event schedules.
 - Either select the
 Complete Schedule or one of the entries listed below.
 - To remove individual entries later, select the lines and click
 delete in the horizontal toolbar.
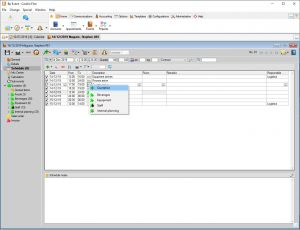
Link a schedule entry to an existing booking*2
- In the schedule list, right-click on
 link to reference an existing
  Quotation or eine
  Sales order. The icon will change to Quotation or Sales order respectively.
 - Changes effected in the schedule will be shown in the booking and vice versa.
- Left-click to open an inspector window with essential booking info (name and details).
- Right-click to open the booking or break the link. Both schedule entry and booking will remain unchanged if the link is removed.
Create a new booking linked to a schedule entry
- In the schedule list, right-click on link to reference an New Quotation or New sales order.
Please note: As soon as any sales orders have been created, no new quotations can be created here. - The booking Name defaults to the descriotion of the schedule entry but can be changed manually.
- Click OK to open the new booking and add sales items.
- Bookings can only be created and linked only for the date(s) of the event, not the set-up or teardown dates.
- Changes effected in the schedule will be shown in the booking and vice versa.
- Save the new booking.
Reject a booking linked to a schedule item
- In the left-hand event navigation, click on Booking > General.
- At the upper edge of the window, change the Booking status from In progress to Rejected and confirm.
- To delete the schedule item as well, answer the prompt with Delete schedule item.
- To retain the schedule item and remove the link, opt to Break link.
- Save the event.
* Event schedule module
*2 Multi-bookings module
Screenshots
Calendars, Tasks and Appointments
- Details
- Written by Sylke Helbing
- Category: Quick Guides
- Hits: 317
1 1 1 1 1 1 1 1 1 1 Rating 5.00 (1 Vote)
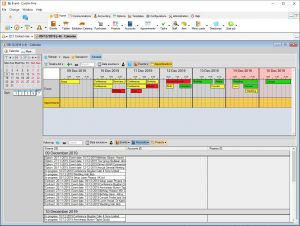
Select a view for your calendar and follow-ups
- Open the calendar tab by left-clicking
 Info Center in the upper left corner quick access pane.
 - In the horizontal toolbar, select the desired view (calendar, timeline, agenda etc).
- Specify the number of days you want to see.
Filter calendar and follow-up data
- Select your
 data sources for the Calender and the Follow-ups displayed in the lower part of the window independently of each other (Events, Appointments, Shifts etc.).
 - Set further
 Filters in the respective data source or switch to other
  lists.
 - Filter for your
 own data only.
 - Save the current settings under Views >
 Save as
  User view,
  Group view or
  Standard view.
 - Create additional IC tabs for various views, important lists etc by going to
 More ... > .
Create a new task
- Go to
 Home >
  Tasks
Tasks > New.
 - Enter the subject and activate a
 reminder.
 - Assign one or more responsible Users or user groups.
- Start and end dates and times are optional. A task with both both start and end times shows in the calendar, a task without times or start time only shows in the list of follow-ups of the responsible users, provided tasks have been selected as data sources.
- A task shows until the status is changed to completed in either the task pane itself or the reminder pane. Alternatively, right-click the entry in the calendar or follow-ups and select Don't remind again.
 Expand user groups to ensure that each group member is notified of the task, and select Must complete individually if the task needs to be performed not just per group but per recipient.
- Link the task to an
 Account*,
  Event or other record.
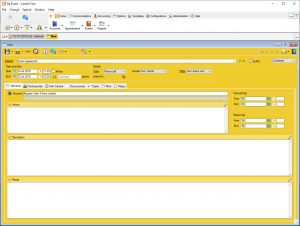
Create a new appointment*
- Go to Home >
 Appointments > New.
 - Enter the subject and date and activate a reminder.
- The appointment shows in the calender of all Bp Event users invited to participate, provided appointments have been selected as data sources.
- Right-click the appointment in the calendar toconfirm or
 cancel your participation.
 - Link the appointment to an Event if applicable.
Invite participants to an appointment*
- On the
 Participants tab under Users, enter the participants who have access to Bp Event. Notify these participants of the appointment by either confirming the prompt, or send an
  Internal Message (icon directly above the input window) to all users on the list.
 - In the same window under Participants, enter those participants whose contact details are stored under Accounts (customers, suppliers). Notify these participants of the appointment by sending an
 Email (icon directly above the input window) to all users on the list.
 - Under External Participants, enter all other attendees. Notify these participants of the appointment by going to the Mail tab and entering the email addresses manually in the recipient list.
* Modules: Appointments, CRM plus
Screenshots
Internal Communication
- Details
- Written by Sylke Helbing
- Category: Quick Guides
- Hits: 160
Bp Event offers a variety of options for facilitating internal communication, such as internal messages, reminders or tasks, as well as the possibility of passing records directly to team members.
Create an internal message to one user
Internal messages are available exclusively for communication with other team members who also have access to Bp Event.
- Left-clicking the Internal messages icon in the top left-hand corner ("Quick Links") opens the inbox, with an option for changing to the outbox tab for sent messages.
- Create a new message by left-clicking the expand triangle > New in the top function bar.
- Fill in the Subject line.
- In the left-hand input pane for Recipients, left-click New to open a list of users and user groups.
- Select a user by double-clicking.
- Messages with a
 High priority will be added to the Reminder lists of all recipients, who will additionally be notified by a pop-up message.
 - Left-click
 Send in the horizontal toolbar to save and send the message.
Send an internal message to multiple users
Internal messages can be adressed to a random set of users, recipient lists or user groups. Messages can be sent either to the group as a whole or to each group member separately.
- Open the list of Recipients by left-clicking New.
- Press down the Ctrl key and left-click multiple individual users, then
 Apply.
 - Alternatively, select a user group by double-clicking it in the list. User groups are marked by a preceding "+" sign.
- To select a
 Distribution list, click on the expand triangle . Create distribution lists under
  Communications > Distribution lists.
 - If you would like every group member to receive the message independently of all others, opt to expand the user group. This means that every group member needs to open and delete the message individually.
Example: All group members need to be aware that an event has been cancelled. - If it is sufficient for one group member to receive and act on the message, opt to Leave as group. The message is "new" only so long as no-one has opened it. It is marked as "read" as soon as one group member openes it and needs to be deleted only once per group.
Example: Group members take turns answering internal messages. - Expand user groups or recipient lists after insertion by selecting the list and clicking on Expand group.
Link an internal message to an existing record
Some records such as events, accounts or appointments allow for the creation of messages linked directly to these records.
- To create an internal message linked to an event or account, first open the record in question.
- Left-click Internal Message in the horizontal toolbar. Depending on the kind of record you are working on, various linking options will be available.
- The subject line of the new message is prefilled with the most important details. All links to events, accounts etc. are displayed in the toolbar and can be opened directly by left-clicking.
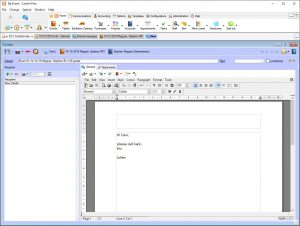
Write the body text and reference records
Go to the ![]() General tab for the body of your message.
General tab for the body of your message.
- Select a
 Template for your message by code or from a list (optional).
 - Insert links to existing records within the text of the message by marking and right-clicking a word or text passage and selecting
 Link. From the available tables, select the record you would like to reference.
 - Insert text snippets, images or timestamps in the same way.
Send attachments
Documents and files can be attached to internal messages.
- In the internal message, go to the
 Attachments tab and click on New.
 - A new entry window for document bundles will open.
- Enter a Name for the new document bundle.
- Click on >
 Attach files to insert external documents from your hard disk.
 - Select >
 Attach general document to insert files from the General Documents folder.
 - Copy documents into other document bundles by clicking
 Copy >
  Copy to other bundle.
 - Click on
 Save >
  Save and close to close the document bundle, not the message itself.
Convert an internal message into an email
Internal messages can also be forwarded to external contacts, team members without access to Bp Event or self as emails.
- In the internal message, go to the General tab and click on Mail. Opt to send the message as either email or email attachment.
- User can also choose to have their own incoming messages forwarded to their email accounts on the
 Options tab > Settings.
Pass records
Open database records can be passed from one user to another along with a short remark.
Example: A phone call is passed on to a colleague along with the customer data.
- In the open record, click on >
 Save and pass.
 - Select a user from the list of currently logged in users and Apply.
- The recipient is notified of the transfer and can either accept or reject the record.
- As soon as the record is opened by the recipient, the sender is notified.
Create tasks for team members
Tasks and reminders help keep everybody to schedule.
Example: The customer expects a call back from the service manager at 10am on Thursday.
- Go to
 Home > Tasks or open a new task from within an existing record by clicking >
  New > Task.
 - Enter a Subject, Date and Time (optional).
- Click on New to select one or more recipients and Apply.
- The author of the task is automatically included in the list of recipients but can be removed manually.
- The task will be listed in the recipient's follow-ups in their
 Info Center, provided Tasks have been enabled as
  Data sources.
 - Also set a Reminder to insert the taskinto the recipient's list of Reminders in their Info Center Quick Picks. The list of reminders cannot be hidden and is a safe way to ensure the recipient is aware of the task.
- Alternatively, click on Internal Message in the horizontal toolbar to notify recipients of a new task.
- Click on Save > Save and close.
*Multi-users module
Screenshots
Working with Events
- Details
- Written by Sylke Helbing
- Category: Quick Guides
- Hits: 246
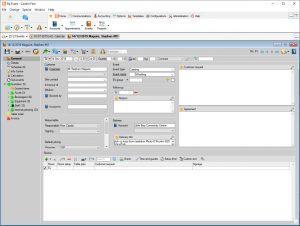
Create a new event
- Go to Home > Events > New.
- If you have a template for similar events, select >
 New from template.
 - Enter a date, start time and guest count. If the date is not fixed yet, enter a reference date and then select
 >
>  Undated.
 - Select a status and status date (such as confirm-by date). Status and status date will determine how and when the event shows in the Info Centre and
 Room reservations.
 - Link either an existing or a new account as Organizer or, if applicable, Orderer or Invoice Adress.
- Enter an Event name (such as "50.Birthday").
- At the bottom of the window, select Rooms > New either via Room list or Room reservations.
- If you prefer, check room availability first by selecting Home > Events > Room reservations, then doubleclick the room and date to create a new event.
- In the left-hand navigation pane, create a new Event schedule and link schedule items to individual bookings*.
Find linked records and data
- In the left-hand navigation pane, go to Info Centre.
- Select the Data sources you would like to see (such as Events, Appointments, Mails).
- Set Filters within each data source or go to Related Lists and Reports.
- Filter for your own records only.
- Save your settings under Views > Save > User view, Group view or Standard view.
- Create New records linked to the event. Only the type of records selected as data source will be available.
Create a quotation
- In the left-hand navigation pane, right-click Quotation and enter a name to create a new quotation.
- Click on New or use the matchcode field to select and add sales items (such as food and beverages, staff, rooms, equipment).
- Add existing items to your quotation by clicking New >
 Find items and entering the item name.
 - Add new items on-the-fly by clicking New >
 Item groups, selecting an item group and entering the item name.
 - To create a proper new item, select Create new and save the new item with all mandatory fields filled. To save the item for this one occassion only, select One-off item.
- Right-click an existing quotation and create a
 New alternative quotation to copy the details of the original and add variations (buffet instead of set menu). The changes only apply to the alternative, not the original.
 - For improved readability, create multiple quotations* for separate positions such as staff, food, beverages or reception, dinner, coffee break.
- In the horizontal toolbar, click
 Print and select a suitable template to print out your quotation.
Send a quotation by email
- Go to New > Mail > New to select a suitable template and, in the toolbar, change the method of communication to
 Email.
 - If you would like to send the quotation itself as formatted attachment, go to the toolbar of the Text tab. In the Event Sheet entry field, call up a list of available templates by pressing Space+Tab and select a suitable template.
- If you are using an external email application, save the quotation by selecting Print > Text >
 PDF and send it as an email attachment.
Create a sales order
- Convert your quotation into a sales order/contract by dragging individual quotations, alternatives or the entire Folder
 Quotation to Sales Order.
 - Add or change sales items, counts, rooms etc. at will. The original quotation will not be affected.
- Create
 Guest lists* to assign tables* or sell individual tickets* for the event.
 - Create custom
 Menu cards* from the selected items, adding individual texts as required.
* Modules Event schedule, Multi-Bookings, Appointments, Guestlists, Ticketing, Table Reservations
Screenshots
Invoicing
- Details
- Written by Sylke Helbing
- Category: Quick Guides
- Hits: 244
Create a new invoice
- Drag your
 Sales orders folder with your left mouse button pressed down onto the
  Invoice folder or create a new invoice by right-clicking Invoice >
  New invoice.
 - If you hav emore than one sales order, choose between one invoice per booking or a collective invoice covering all sales orders.
- Enter a custom name for the invoice or accept the default by clicking OK.
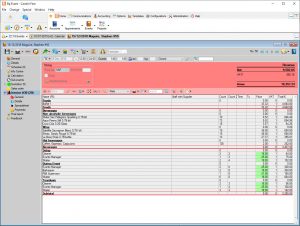
Change or add to invoice data
- In the horizontal tolbar, click New to add new
 Items,
  Subtotals or
  Remarks.
 - In the column Count, enter the actual consumption or, in column Count 2, the hours for items charged at an hourly rate.
- Edit prices directly in the Prices column.
 Collapse the list to remove any items with a zero count or without price.
Create an advance invoice
- Right-click Invoice
 New advance invoice.
 - Add the item "Deposit" (create item without price or other details in item group "Others"), enter the amount of the deposit under Price and enter the Count "1".
- Generate the spreadsheet and print or email the document.
- Enter any payments against the advance invoice before assigning the advance incoice to a final invoice.
- Right-click n the final invoice and select Assign open advance invoice to assign both the invoice and any payments to the final invoice..
Create a credit note
- Right-click the faulty invoice and select
 Create new credit note.
 - All items in the booking are copied with a minus sign in front of Count 1.
- Click on
 Spreadsheet and save to generate a consecutive number.
 - From
 Invoive templates, select a "Credit note" template for printing.
Create a collective invoice
- Right-click Invoice > New invoice and enter a custom name or accept the default name.
- Right-click again, select
 Convert to collective invoice and save the event by confirming the prompt. A new entry list will appear at the bottom of the window.
 - Click New in the toolbar of the new entry window to add partial invoices. The partial invoices must have the same invoice address, and belong to the same site and cost centre. Closed or rejected invoices are not eligible.
- Partial invoices created after the collective invoice can be added by right-clicking and selecting
 Add to collective invoice.
 - Select Close collective invoice at the top left-hand corner of the input window.
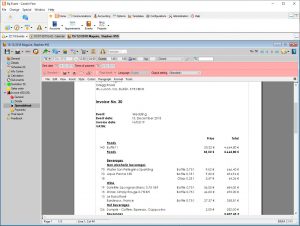
Print the invoice spreadsheet
- Go to Invoice > Spreadsheet and confirm the prompt by clicking Save to create a consecutive invoice number.
- If there is only one standard invoice template, this will be applied automatically.
- Select a different template or one of several standard templates from
 Standard or Invoice templates.
Send the invoice
- Print your invoice by clicking on
 > Print in the horizontal toolbar of the invoice, or save externally in a >
  PDF-Format.
 - Send your invoice as an > Email attchment. An email addressed to the invoice address and containing all event and booking references will open automatically.
- A Customer print, as opposed to a Proof copy, contains a valid invoice date which will impact the dunning run.
Screenshots